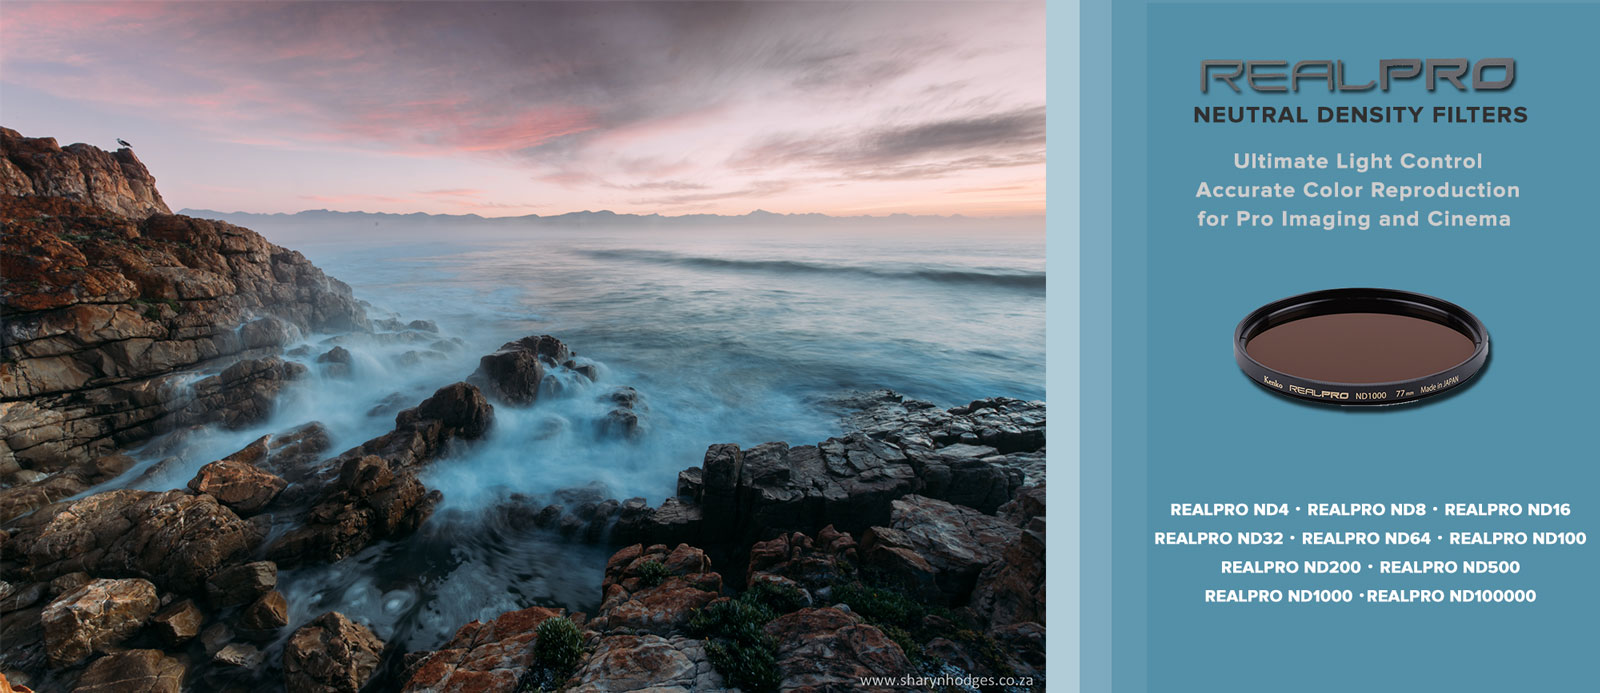
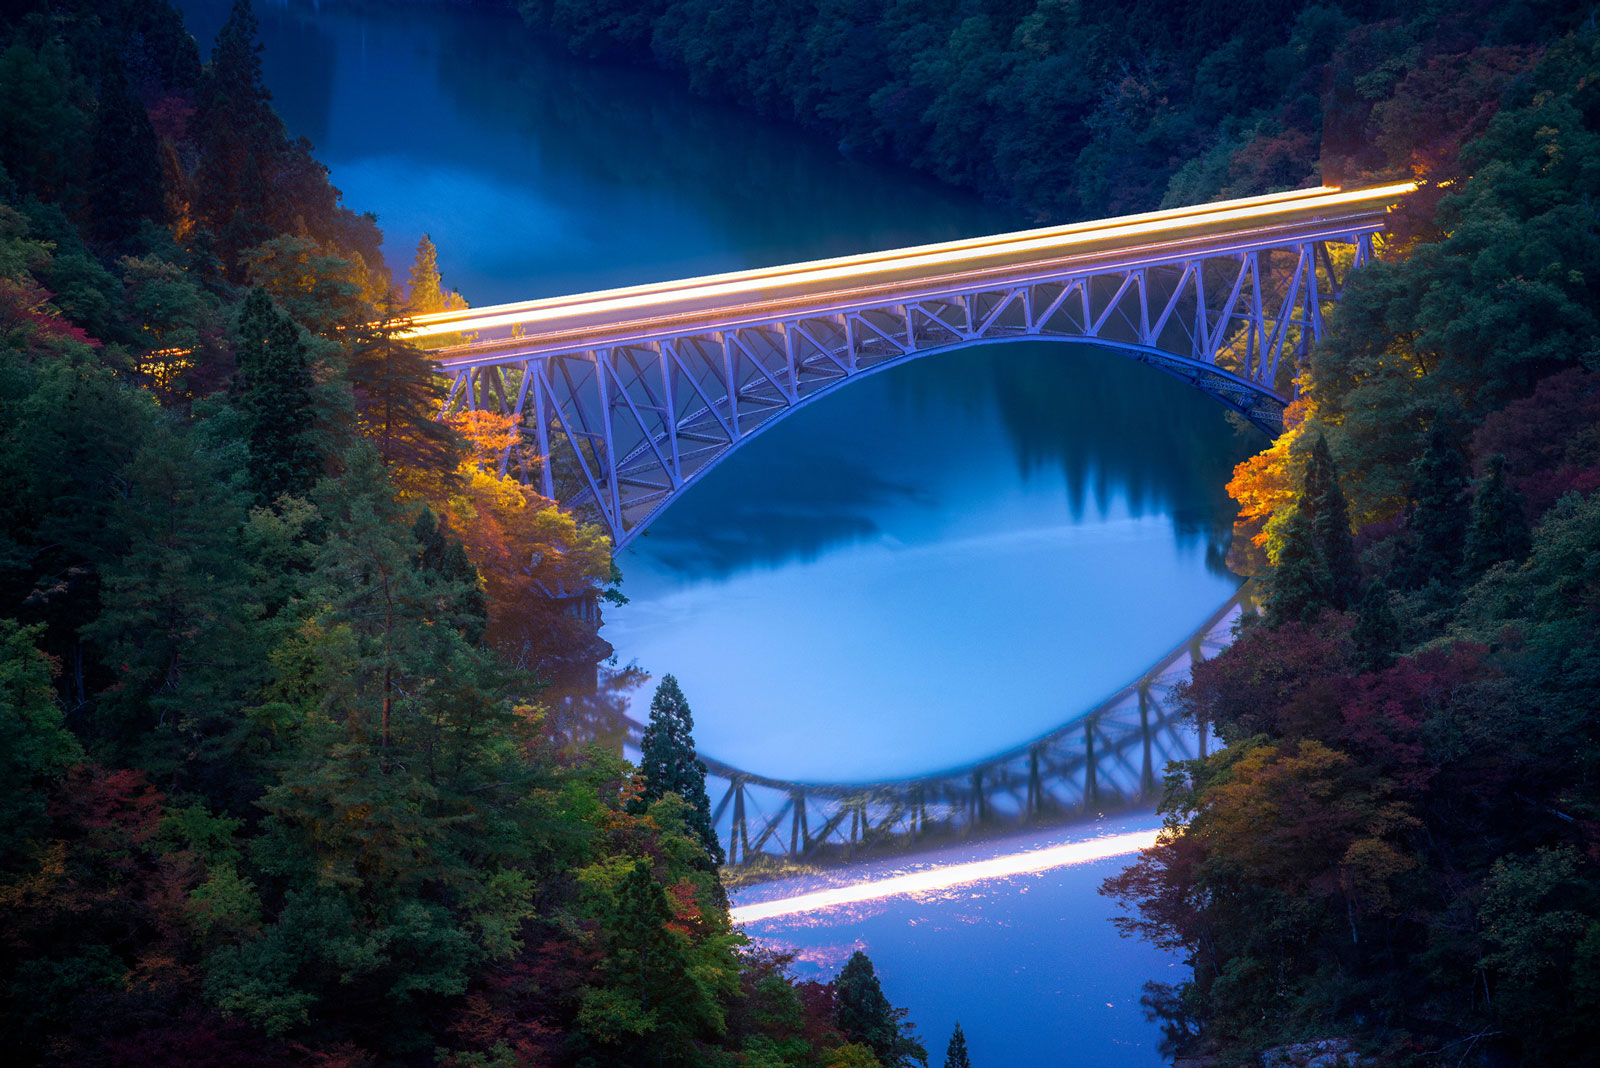
Shoot professional photos with ND filters
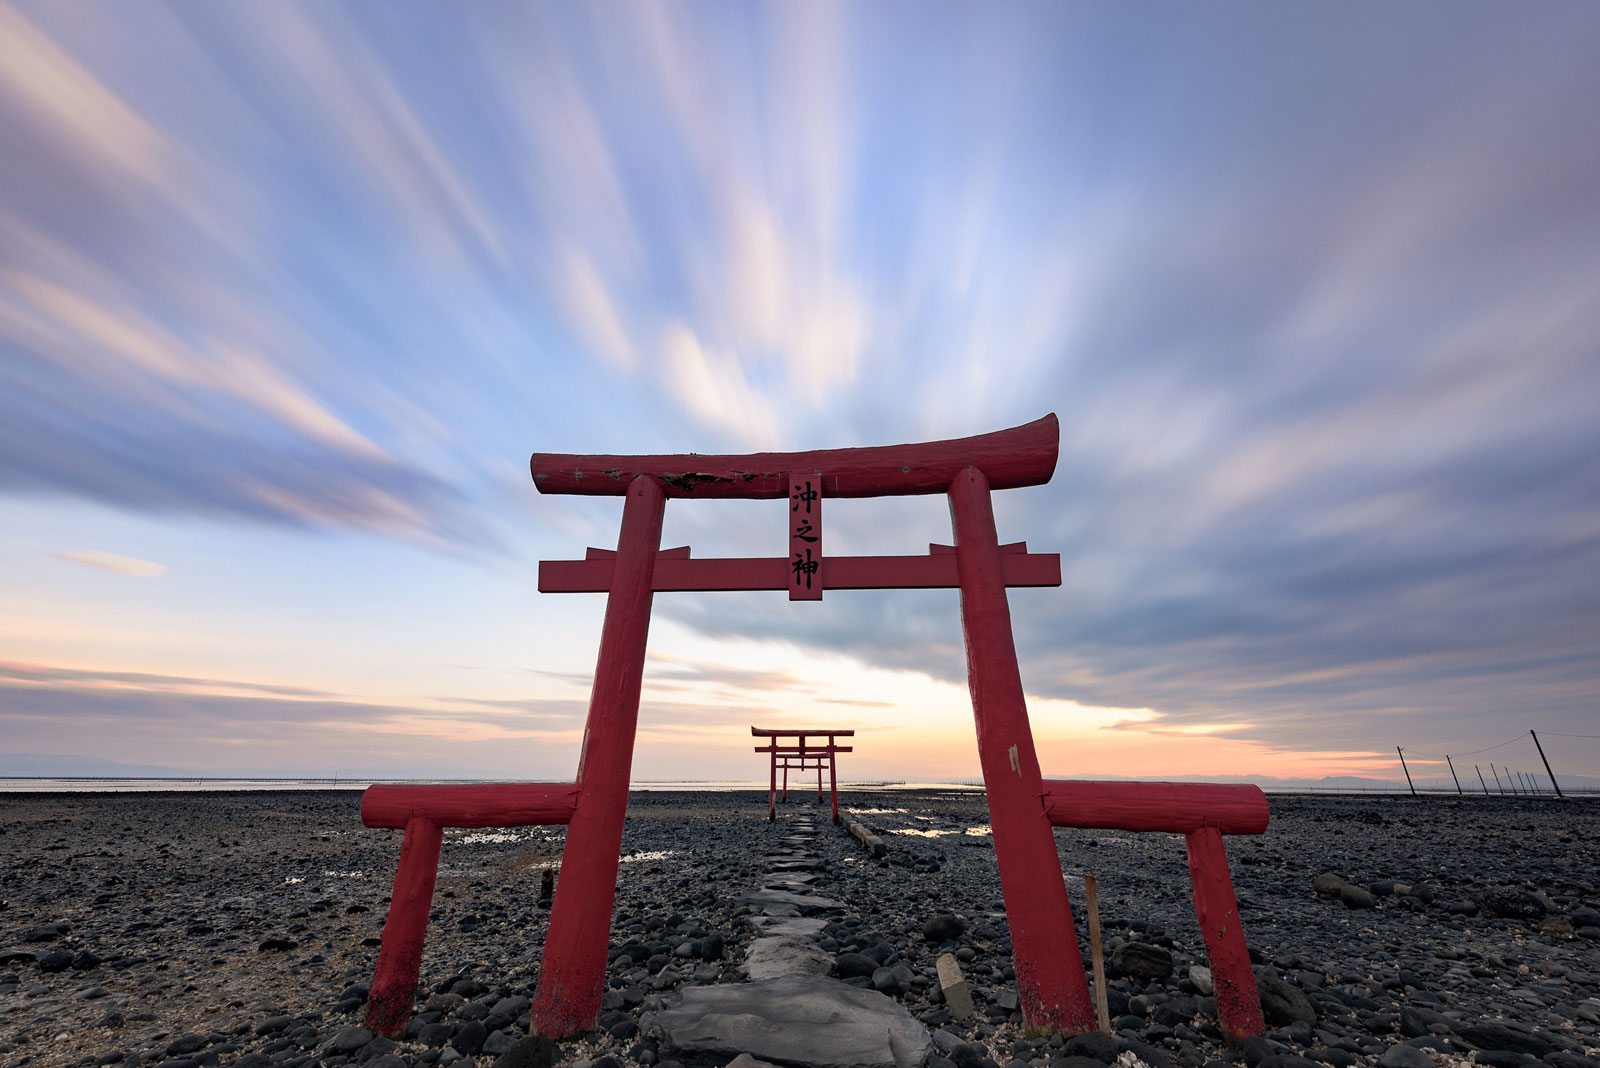
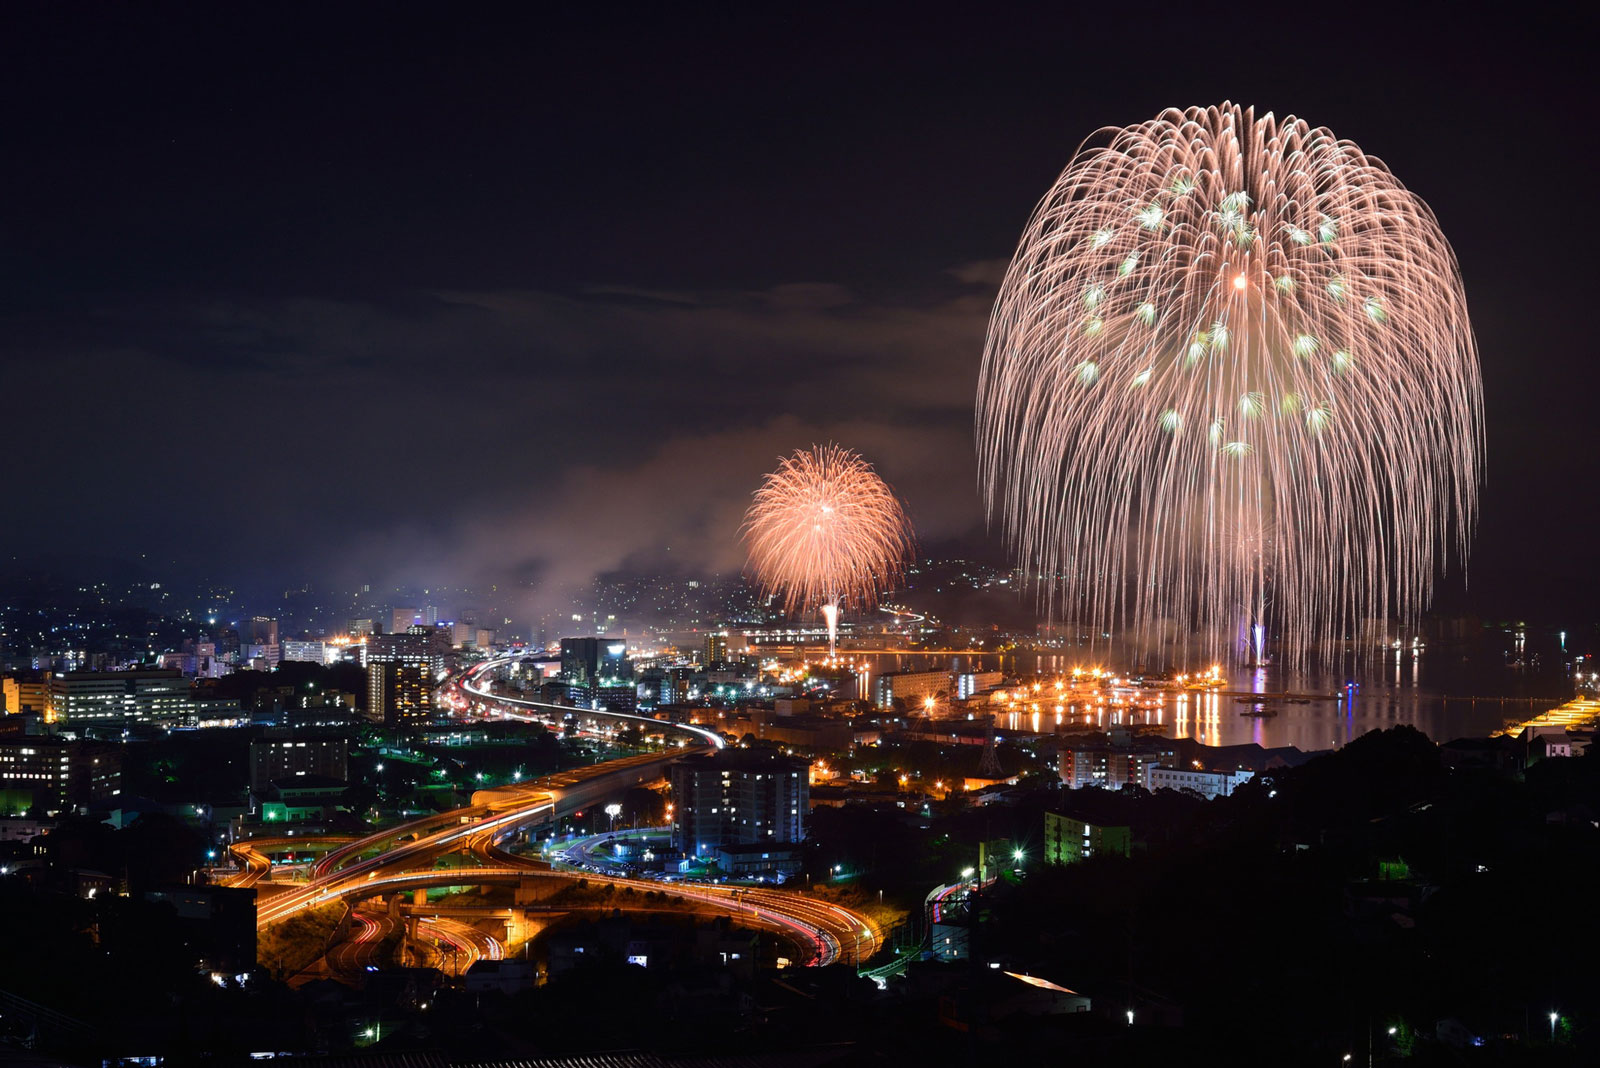
All the photographic works in this guide are awarded photographic works from the International Filter Photo Contest.
Increase expressiveness with ND filters
Recent photographic trends show an increased popularity of slow shutter photography. The main attractiveness of shooting at a low shutter speed is the potential of creating those impressive and vibrant images showing things the naked eye usually cannot see, conveying your own taste, creativity and feelings.
Must-have tools in slow shutter photography are ND filters (filters for light reduction).
By understanding and mastering the use of ND filters, you will remarkably increase the expressive potential of your shots.
ND filter: What is it?
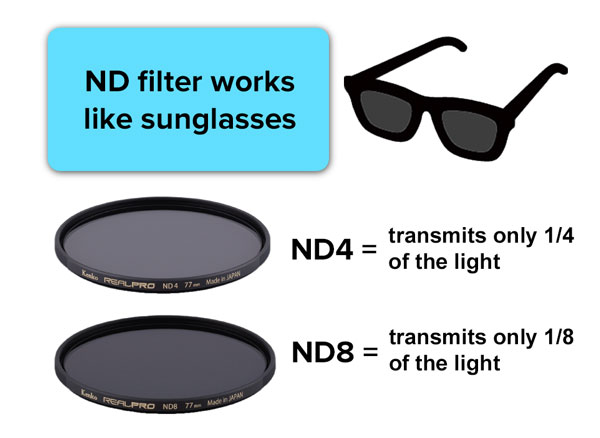 A ND filter is a grey glass filter that reduces the amount of light entering the camera lens. Basically, it works in the same way your sunglasses reduce the dazzle of the sun for your eyes.
ND means "neutral density", as ND filters can in fact reduce the amount of light entering the lens without affecting color rendering and color reproduction.
ND filters usually come with a numeric value, like ND4, ND8 etc. The higher the number, the more you can slow down the shutter speed.
The numeric value also shows the amount of light reduced. For example, ND4 = 1/4 light amount reduction, ND8 = 1/8 light amount reduction, and so on. On ND filter packages you may also find indications like "3 stops light loss", etc. This indicates how many aperture stops you will lose when using ND filters. For example, a "1 stop light loss" means approximately a 50% reduction in light amount, a "2 stops light loss" a further 25%, a "3 stops light loss" a further 12.5%, and so on.
| Filter | ND2 | ND4 | ND8 | ND16 |
| Light reduction | 1/2 | 1/4 | 1/8 | 1/16 |
| Exposure factor (approx.) | 2 | 4 | 8 | 16 |
| Light loss | 1 stop | 2 stops | 3 stops | 4 stops |
| Transmittance (approx.) | 50% | 25% | 12.5% | 6.25% |
About aperture and shutter speed
Some notions about aperture and shutter speed are required to master the use of ND filters.
The first thing you need to know is that "exposure" (i.e. how much your image will be bright) is determined by combining "aperture" and "shutter speed"*.
* ISO will determine your exposure value as well.
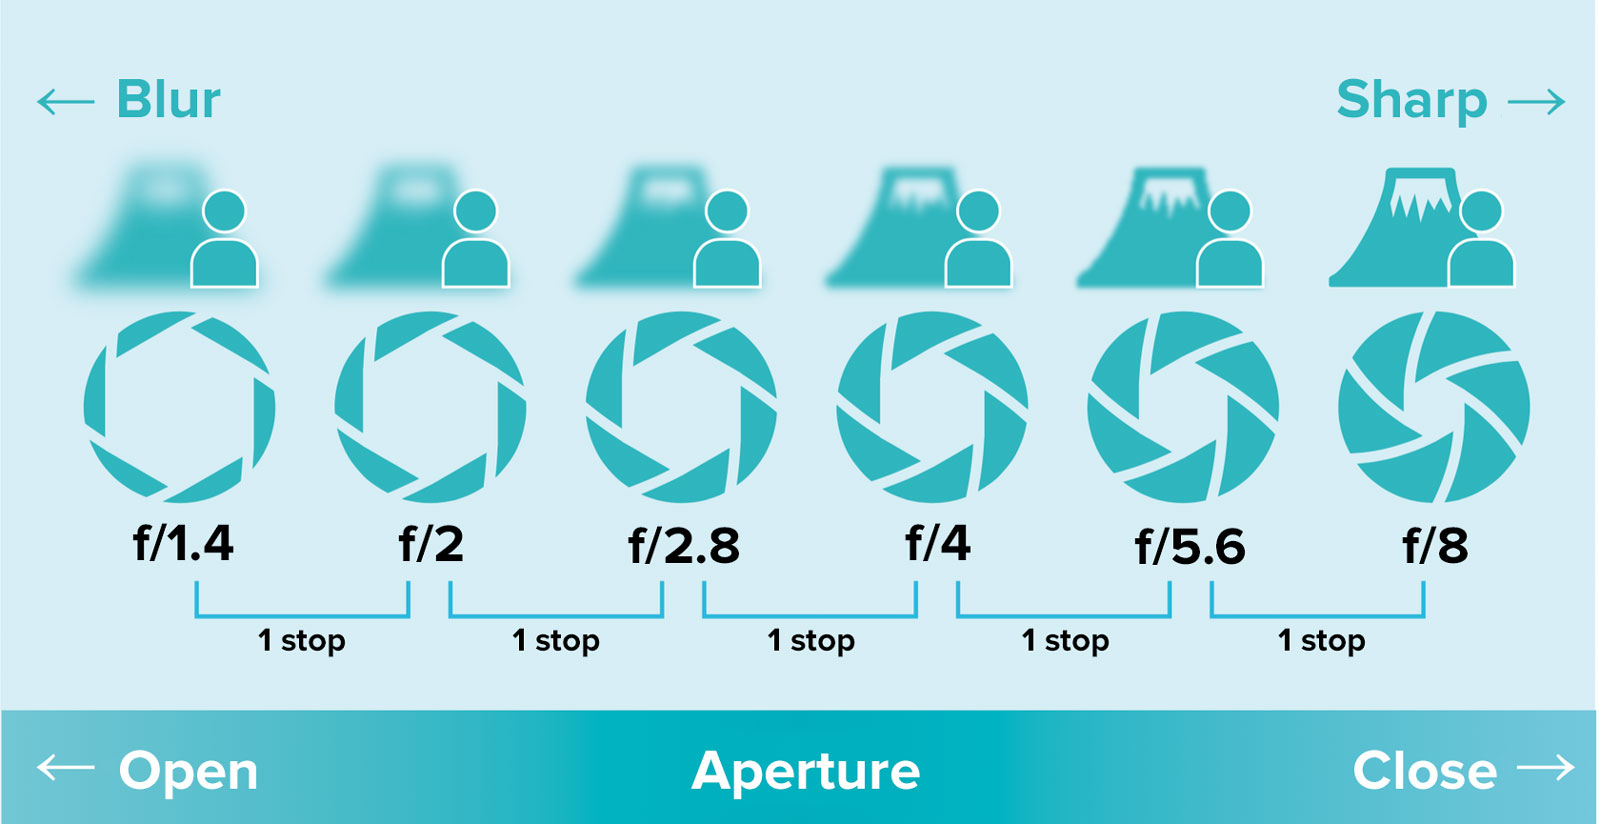
Aperture
The aperture controls and regulates the amount of light allowed to enter the lens.
It is expressed in f-numeric values (aperture value). Standard f-numeric values are, for example, f/1.4, f/2, f/2.8.
The higher the f-number, the smaller the quantity of light will be allowed to enter the lens, and vice versa. For example, when switching from f/1.4 to f/2, half the amount of light allowed to enter the lens is cut off.
Aperture also affects depth of field (i.e. how much your image will look sharp or blurred). With a low f-number value, for example, you can get a much blurred background.
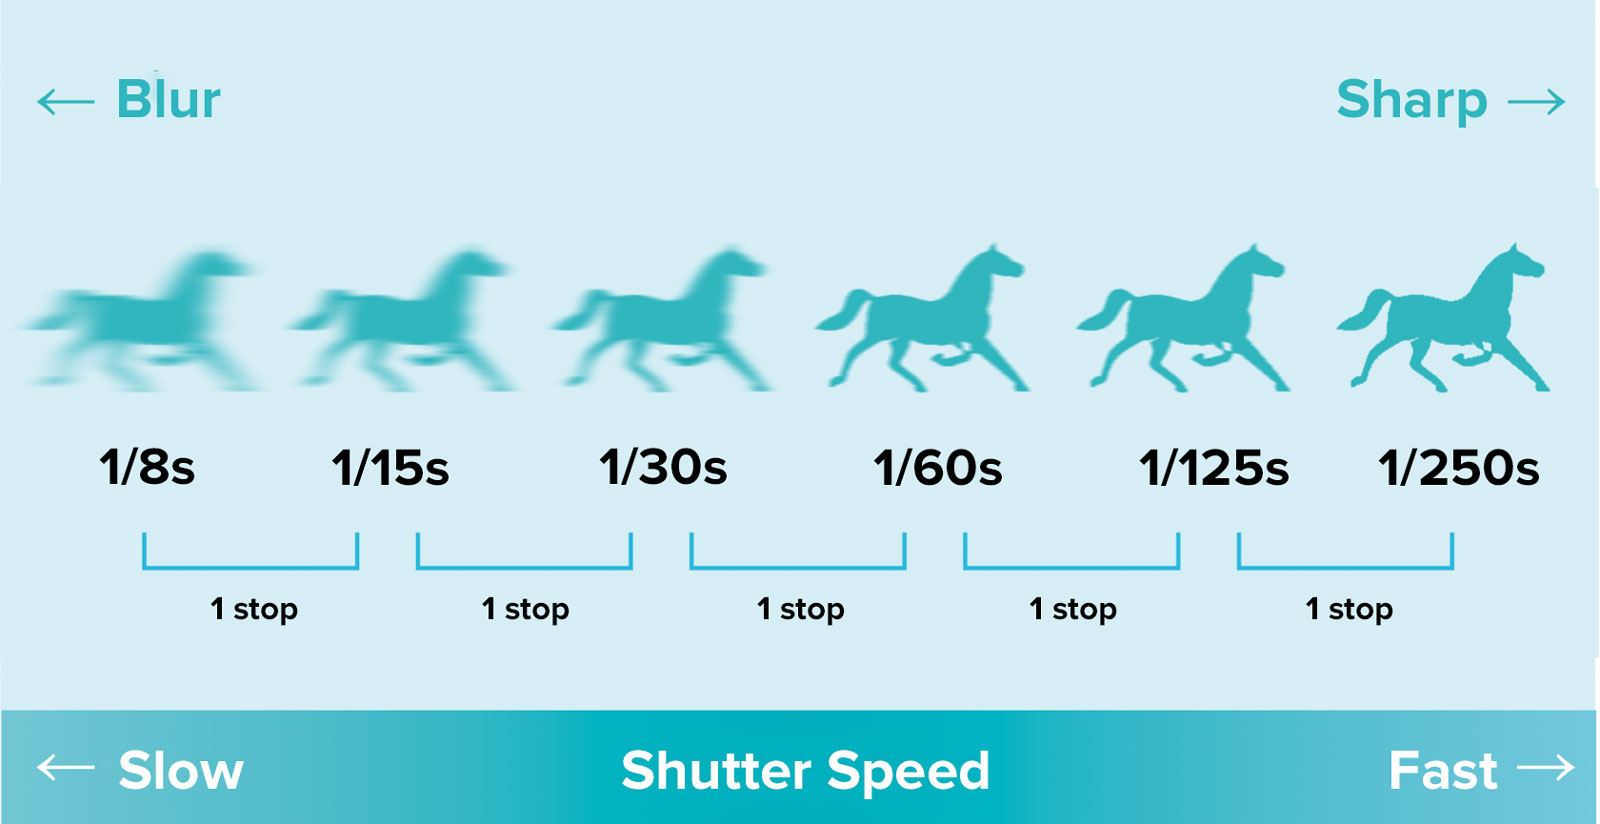
Shutter Speed
The shutter speed is the amount of time your camera shutter will stay open. When the shutter is open, the light can hit the sensor and the image can be captured. The slower the shutter speed, the longer the light hits the sensor.
For example, when setting the shutter speed from 1/60 sec to 1/30 sec, the amount of light hitting the sensor is doubled.
With a slow shutter speed you can capture and express the movement of moving objects in your images.
When are ND filters necessary?
When you need to slow down the shutter speed
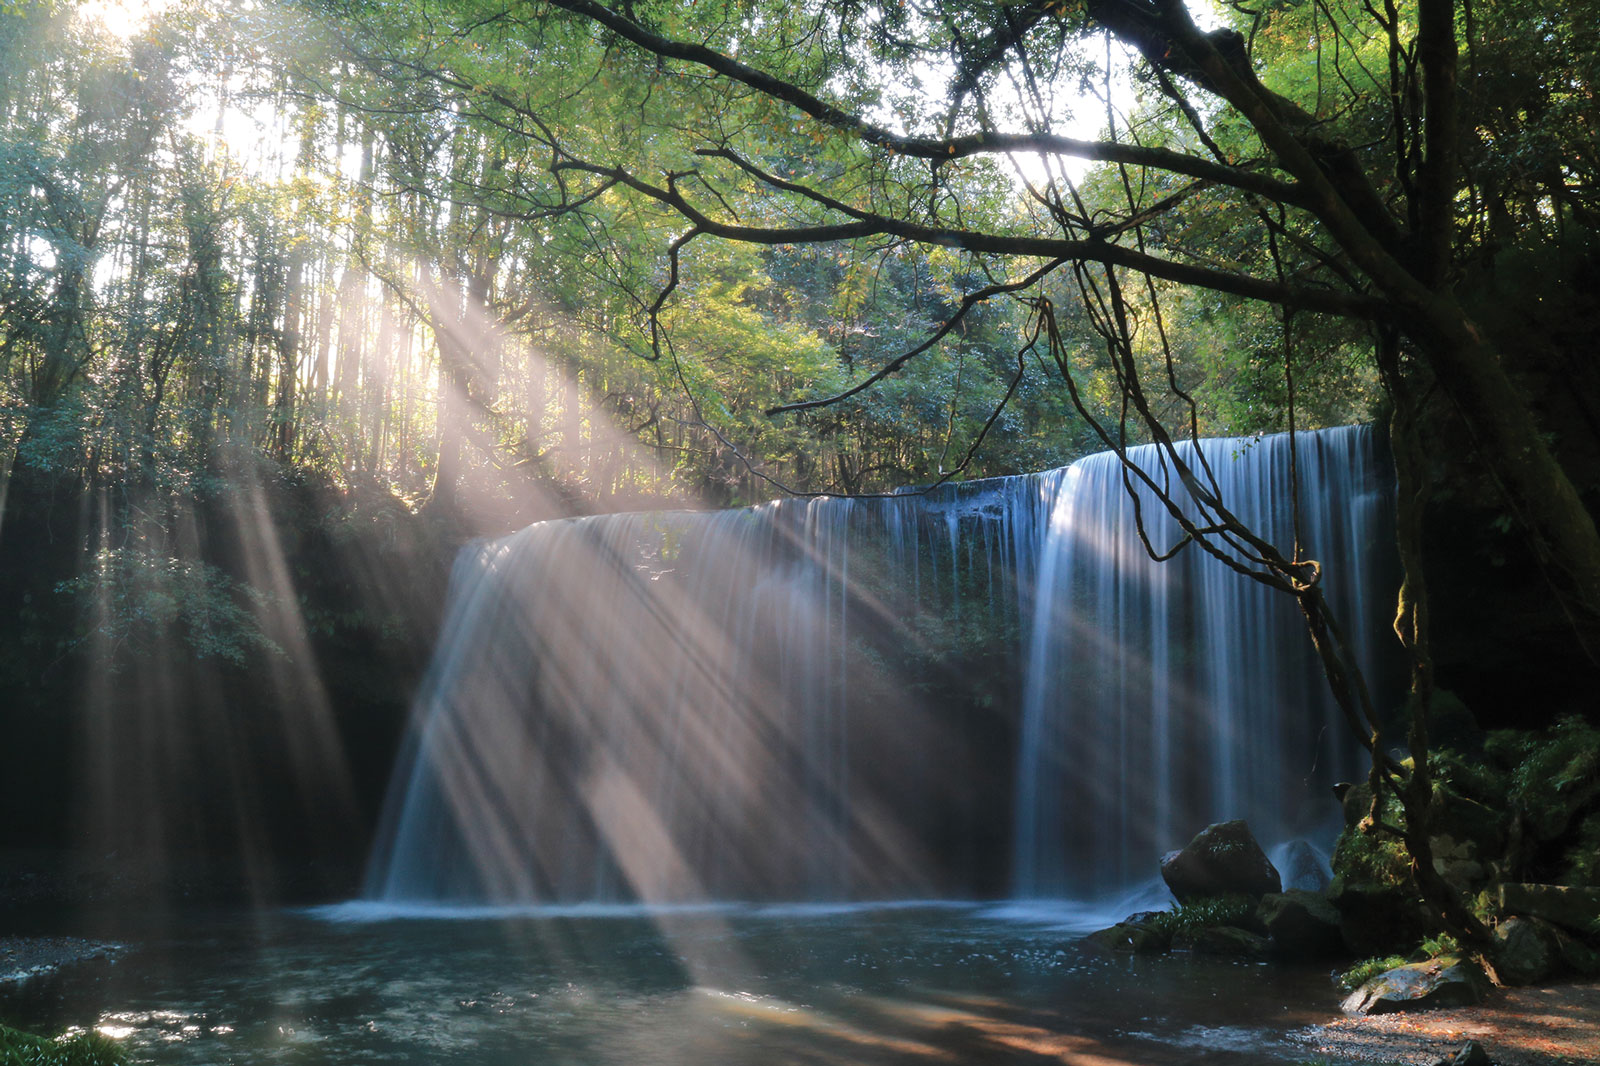
By slowing down the shutter speed, you can intentionally create movement in your pictures. For example, when shooting waterfalls at a slow shutter speed, you can reproduce in your photos the flowing smooth movement of the water, as in the image below:
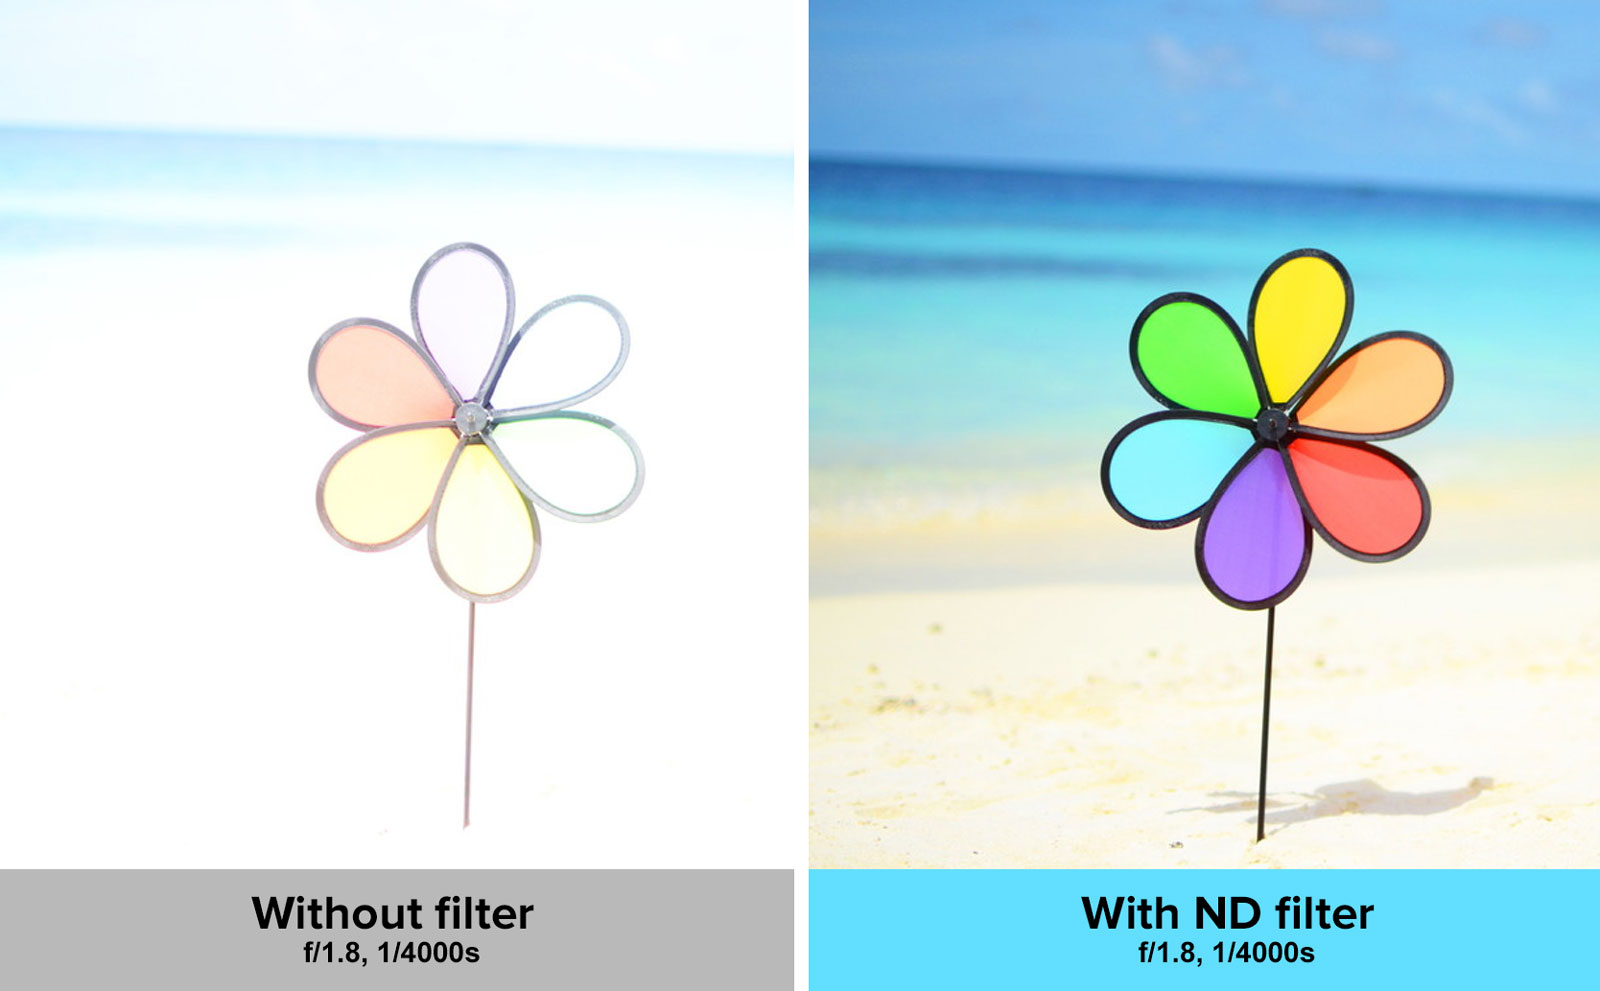
When you need an open aperture as you want to blur the background
Open aperture in bright, sunny days can get your image overexposed. Using a ND filter in this light situation will help you reduce the amount of light to achieve proper exposure with your aperture wide open.
I can adjust exposure with camera settings. Why ND filters are still necessary?
To further slow down the shutter speed
Technically speaking, you could slow down the shutter speed by simply closing up the aperture (i.e. by setting bigger f-number) but there will be still some limits, ending up in overexposed images. Moreover, shooting with a too big f-numbers (i.e. an closed aperture) means poor image quality on your final picture (see "diffraction phenomenon").
When you need an open aperture as you want to blur the background
On bright, sunny days, even if shooting with a low aperture value (for example f/1.4 or f/1.8) and at the limits of the camera's shutter speed (for example 1/4000 sec or 1/8000 sec), your pictures may still result overexposed. In these light conditions, too, ND filters are necessary.
Diffraction phenomenon: What is it?
In photography, diffraction occurs when light waves encounter an obstacle, causing them to bend around this obstacle.
With a big f-number, that means a small aperture's hole diameter, the light entering the diaphragm hole bends around it and consequently cannot reach the image sensor elements, causing degradation in the final image quality.
The images below show, for example, the difference in image quality when shooting at f/8 or f/22 respectively.
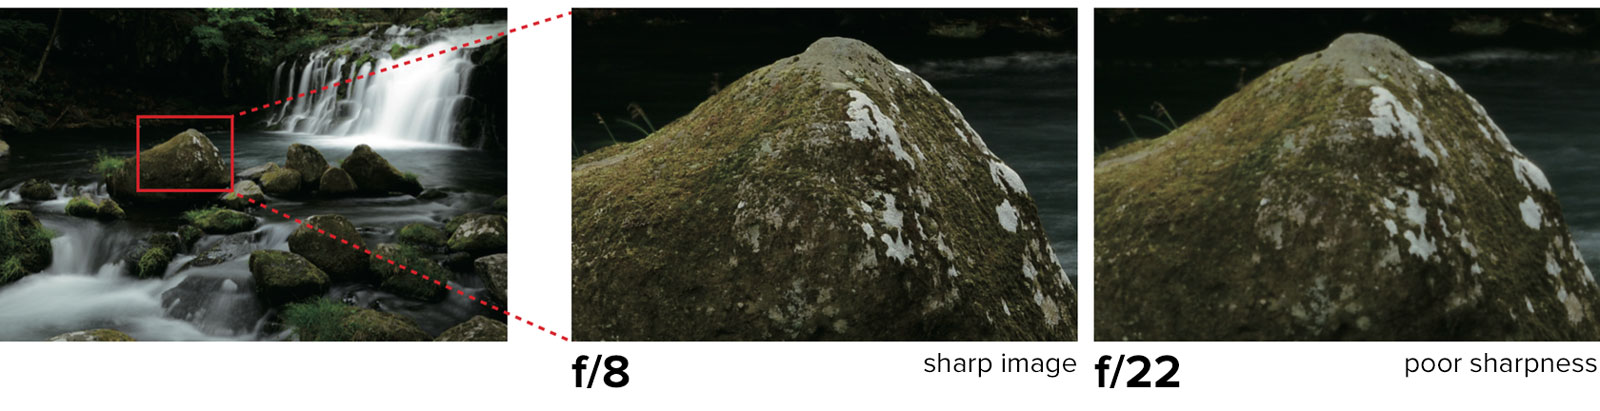
As you can see in the picture enlargement, the difference is remarkable: a sort of haze affects the picture taken at f/22, resulting in poor sharpness compared to the picture taken at f/8.
Here ND filters are essential to let you shoot at a low shutter speed without closing the aperture up to f/22.
How will my pictures change with ND filters?
Here a few examples showing how impressively water expression can be changed when using different ND filters.
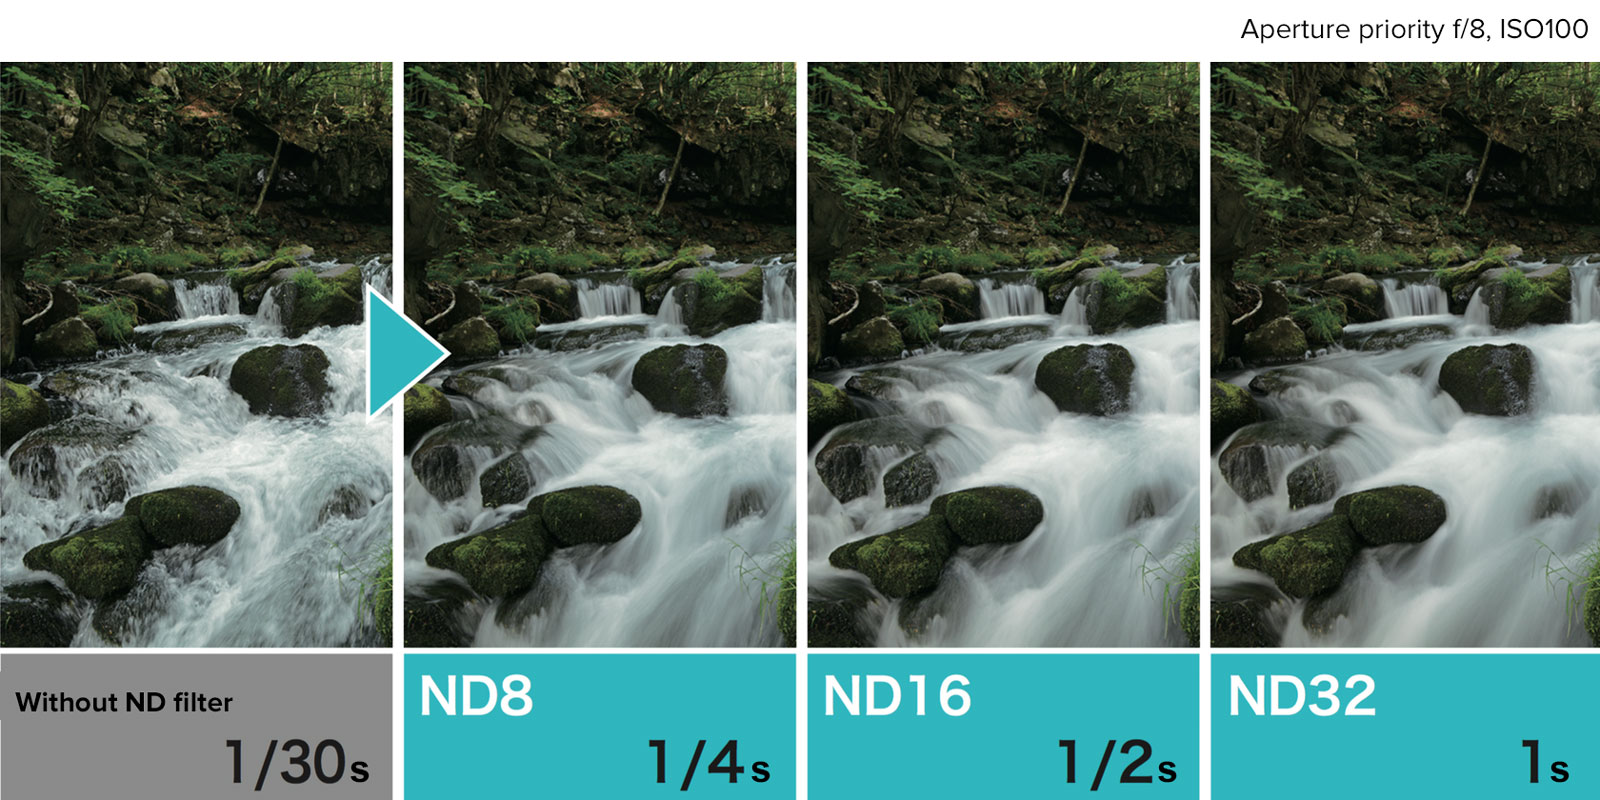
By using ND filters, you can for example capture impressive images of waterfalls at a low shutter speed. A 1/30 sec shutter speed can be extremely slowed down at 1/4 sec by using a ND8 filter, thus effectively capturing the natural flowing of the waterfalls in the final image.
Furthermore, as you can see from the image taken with ND16 and ND32 filters, even with just 1 stop difference in shutter speed, the higher the ND value, the smoother the waterfalls will look like.
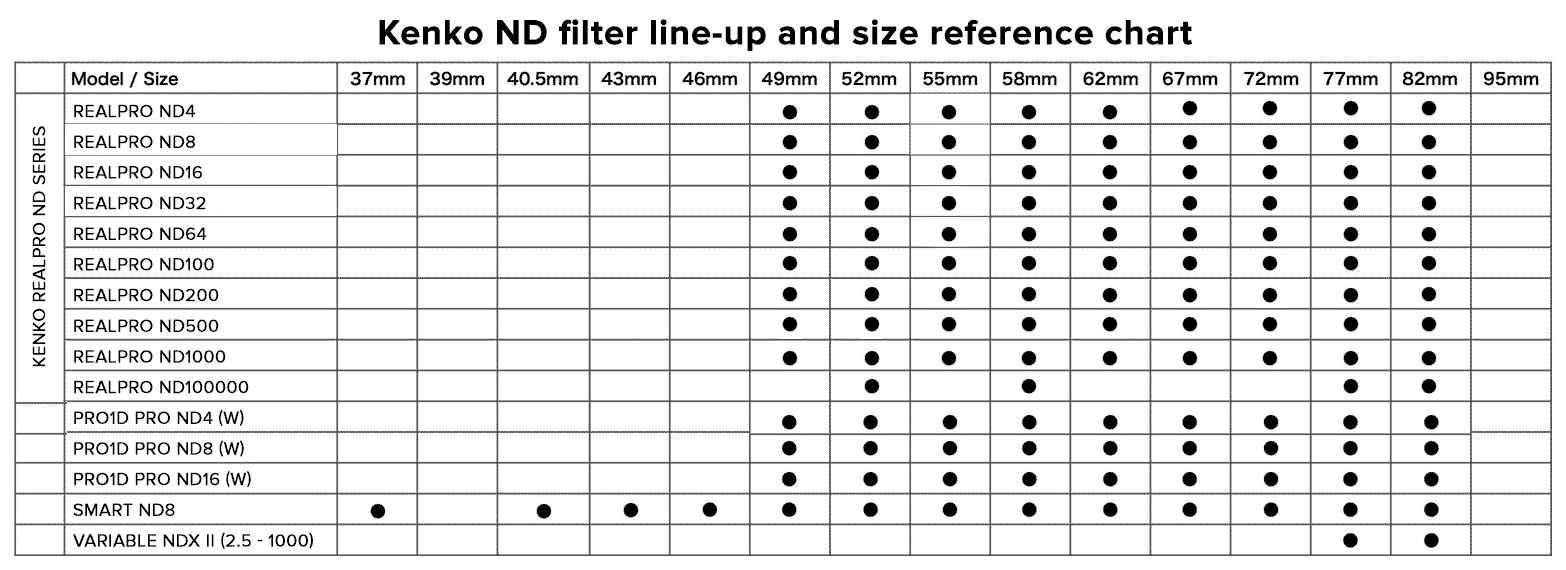
How to choose ND filters
What filter should be used? Choosing the right ND filter depends on different factors, like the shooting object, the light and the weather, what you want to express, the taste you want to add to your photos, and so on.
To choose the right ND filter, you can follow these general rules and refer to the corresponding tables below:
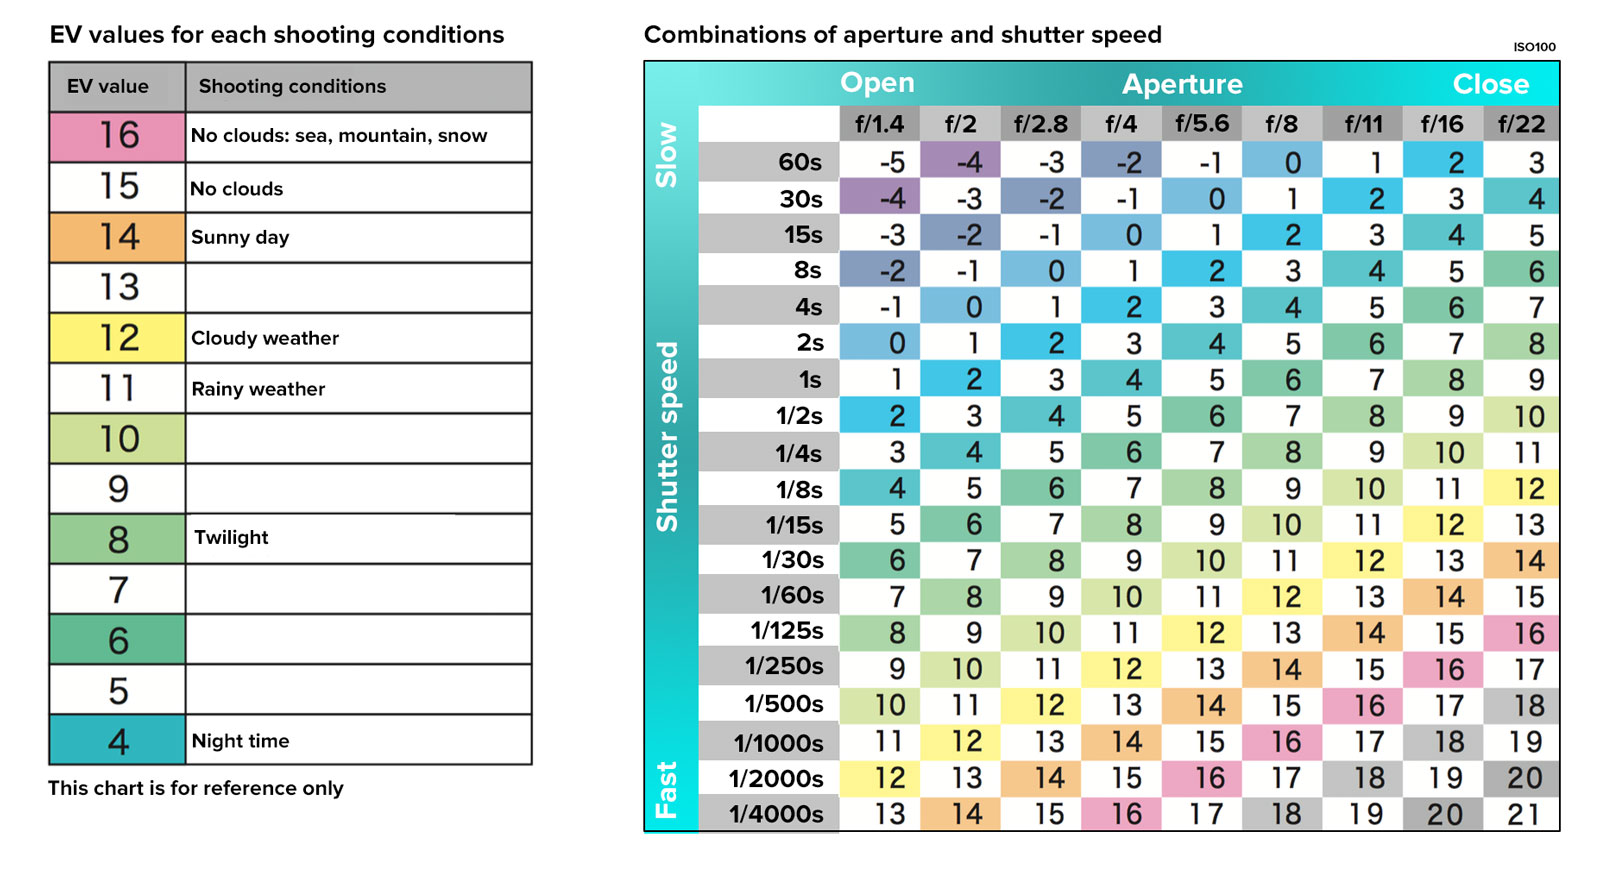
Table 1: Check the proper EV value depending on the shooting conditions.
Table 2: Check and combine both aperture and shutting speed according to EV value.
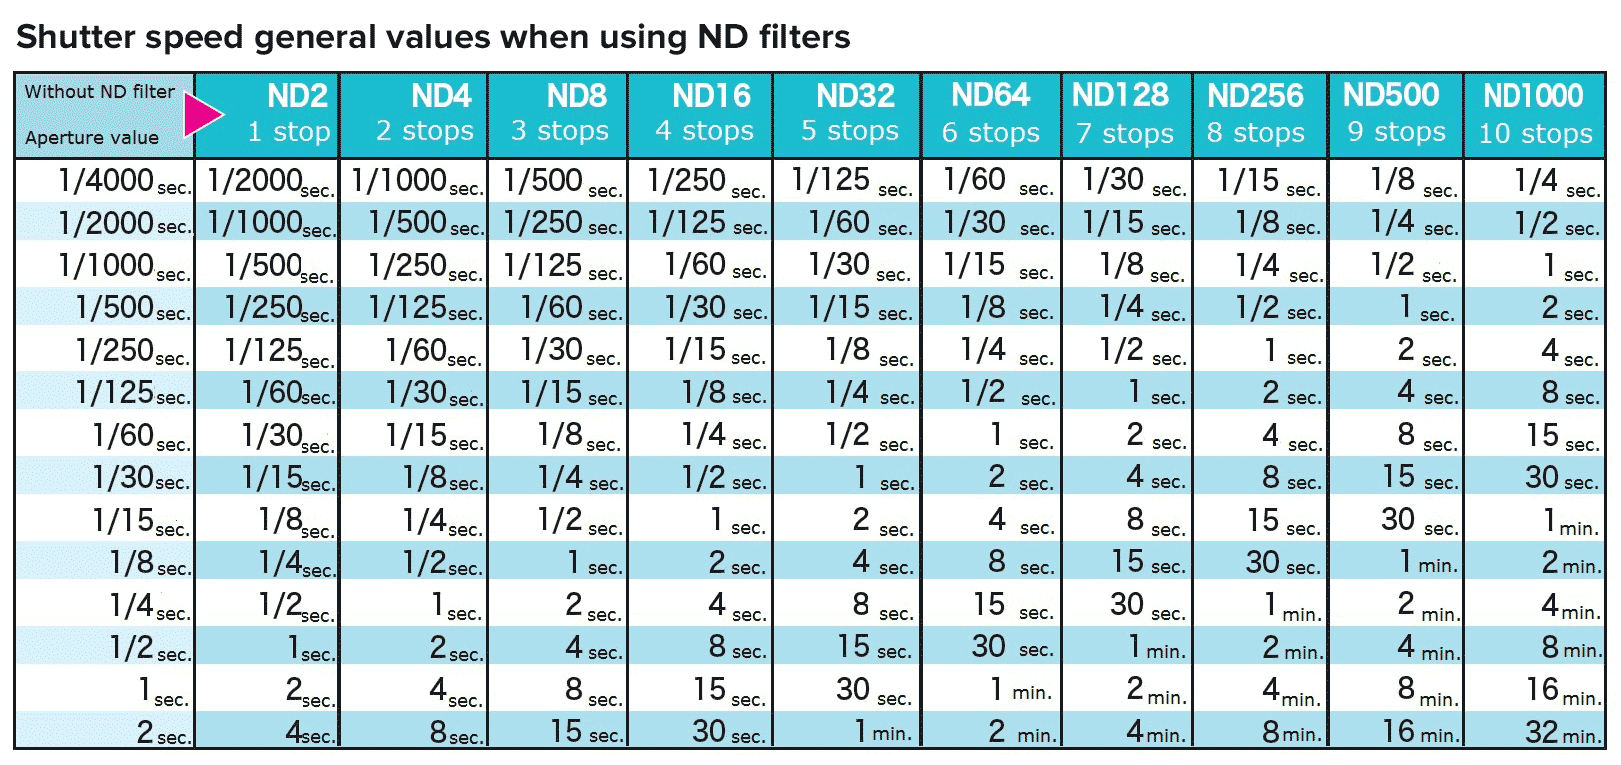
Table 3: Check approximately what shutter speed you can get according to the ND filter you are going to use.
Let's now use these values and information in some practical examples.
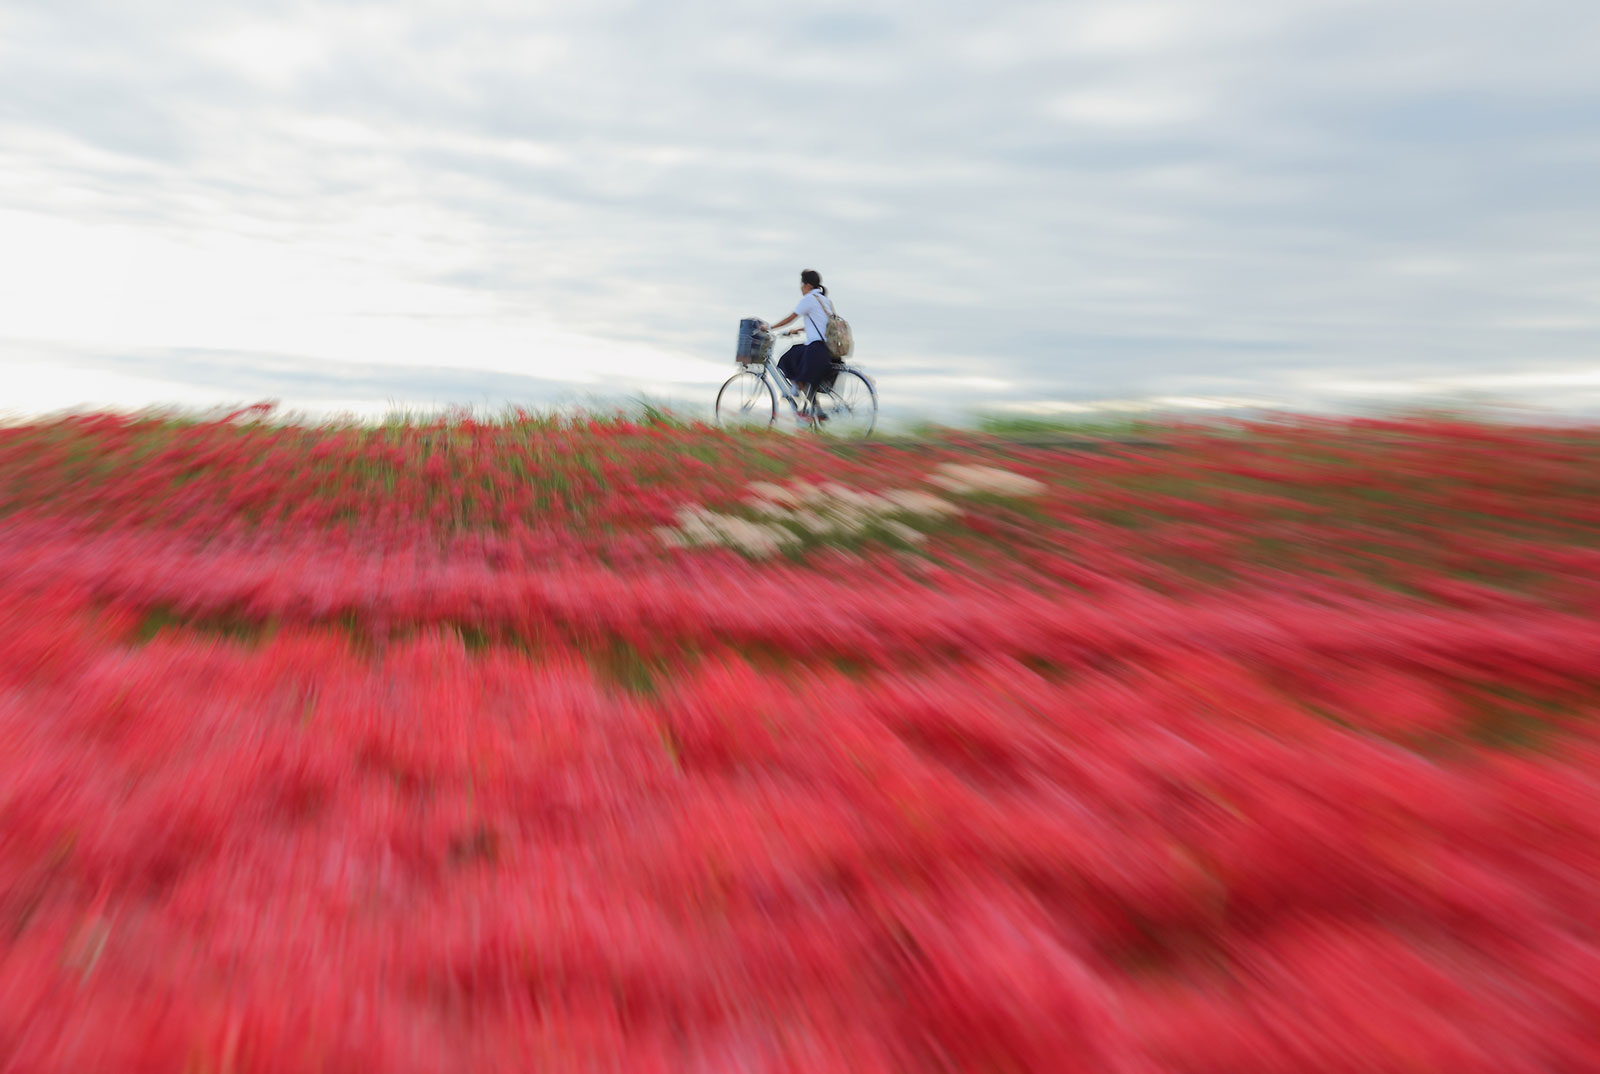
Example 1. To take impressive snaps of moving objects

Let's say you want to take an impressive snap of a moving object in sunny day and with a shutter speed of 1/30 sec.
Table 1: "Sunny day" corresponds to "EV 14".
Table 2: If shooting, for example, at f/8 with EV 14, the shutter speed will be 1/250 sec.
Table 3: By using a ND8 filter, you can slow shutter speed down to 1/30 sec.
Tip: If you feel you may need to slow down the shutter speed when shooting, try then to increase f-number as well.
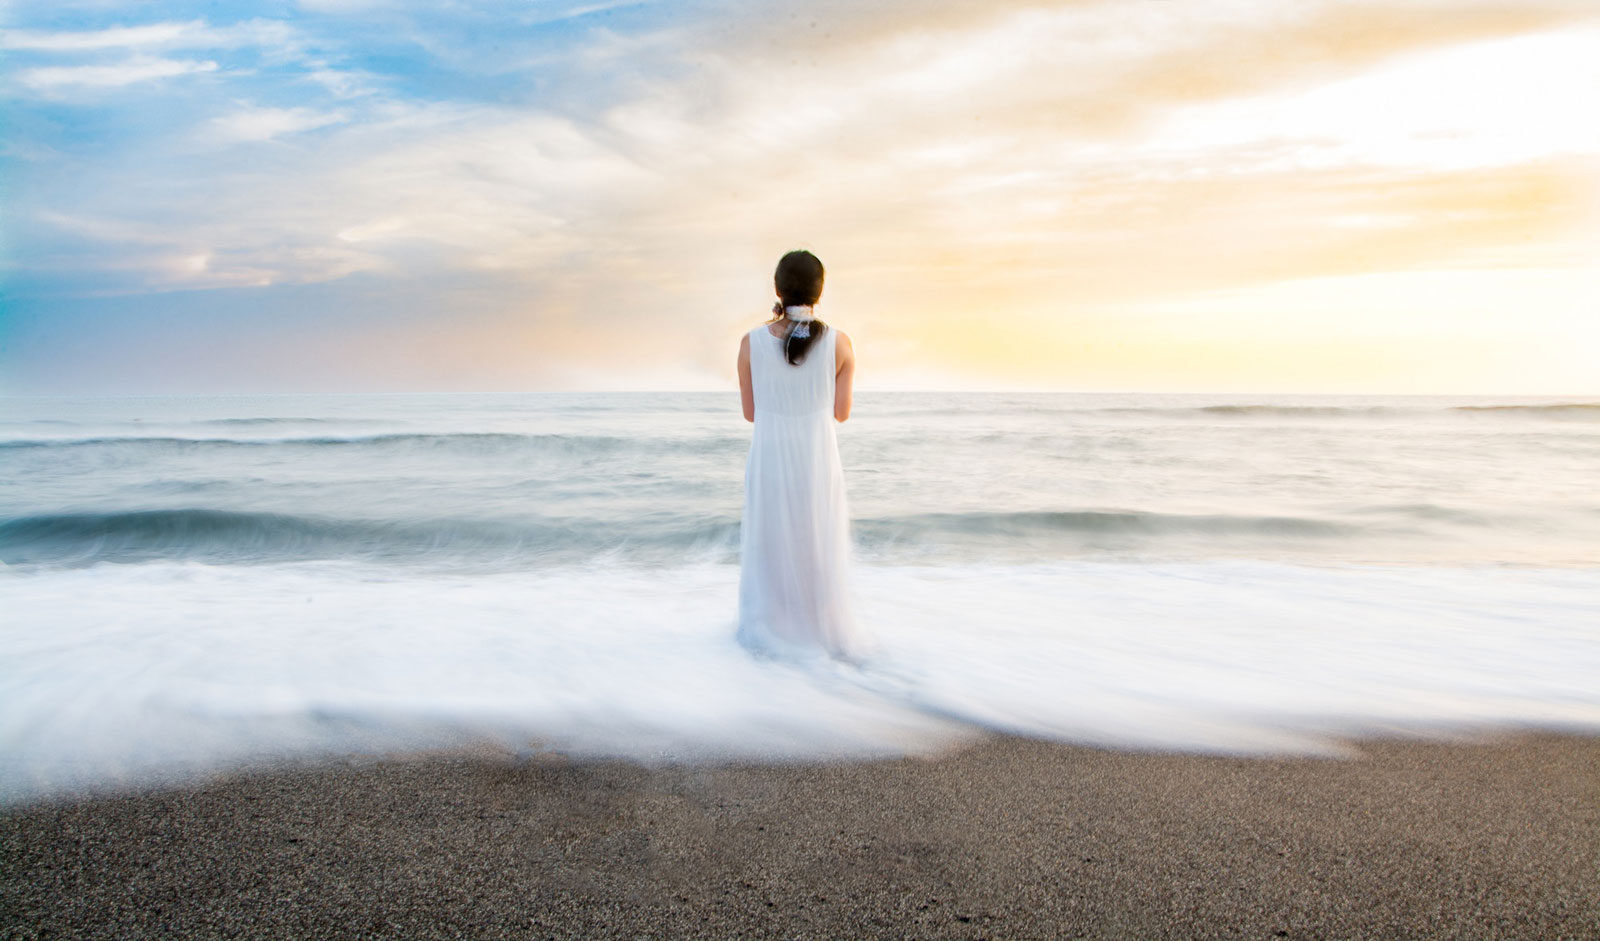
Example 2. To create dreamy and misty sea waves in a sunny day
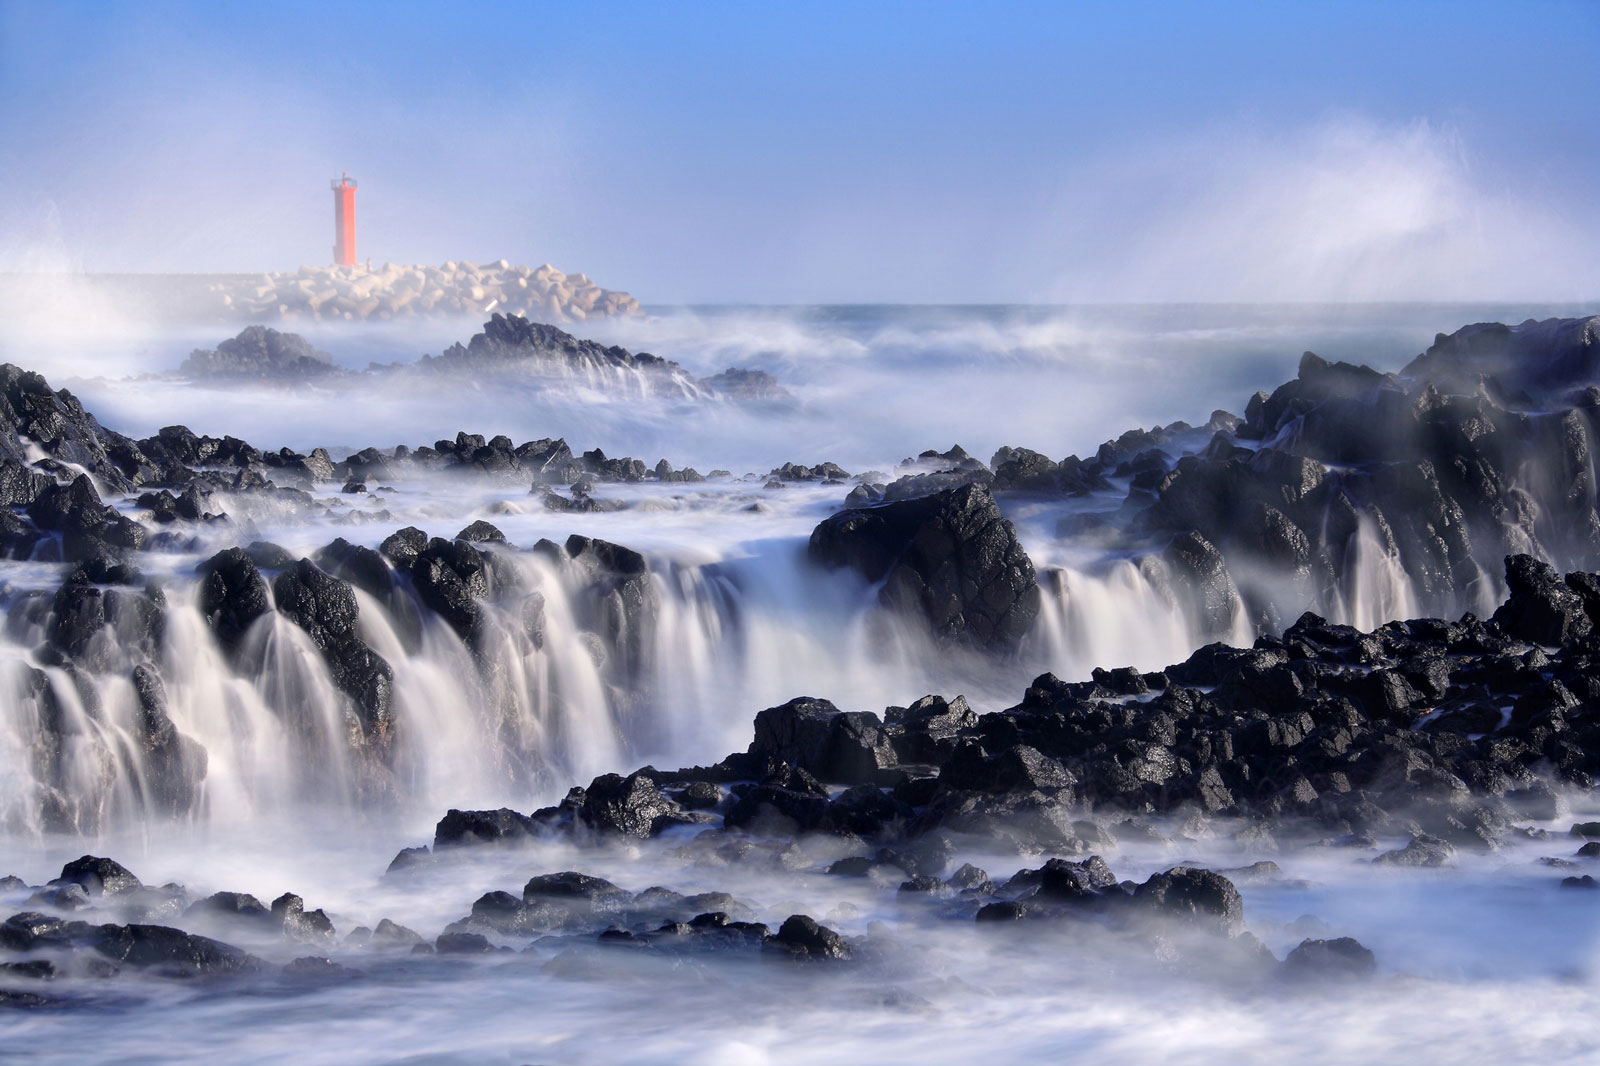
Table 1: Cloudless sky/seaside location corresponds to EV 16.
Table 2: If shooting, for example, at f/8 with EV 16m, the shutter speed will be 1/1000 sec.
Table 3: By using a ND1000 filter, you can slow shutter speed down to 1 sec.
Tip: If you shoot with an exposure longer than 10 sec in this shooting situation (cloudless sky, seaside), even a ND1000 won't be enough. By combining a ND1000 and ND16 together, though, you can get a 15 sec exposure. (14 stops of light reduction).
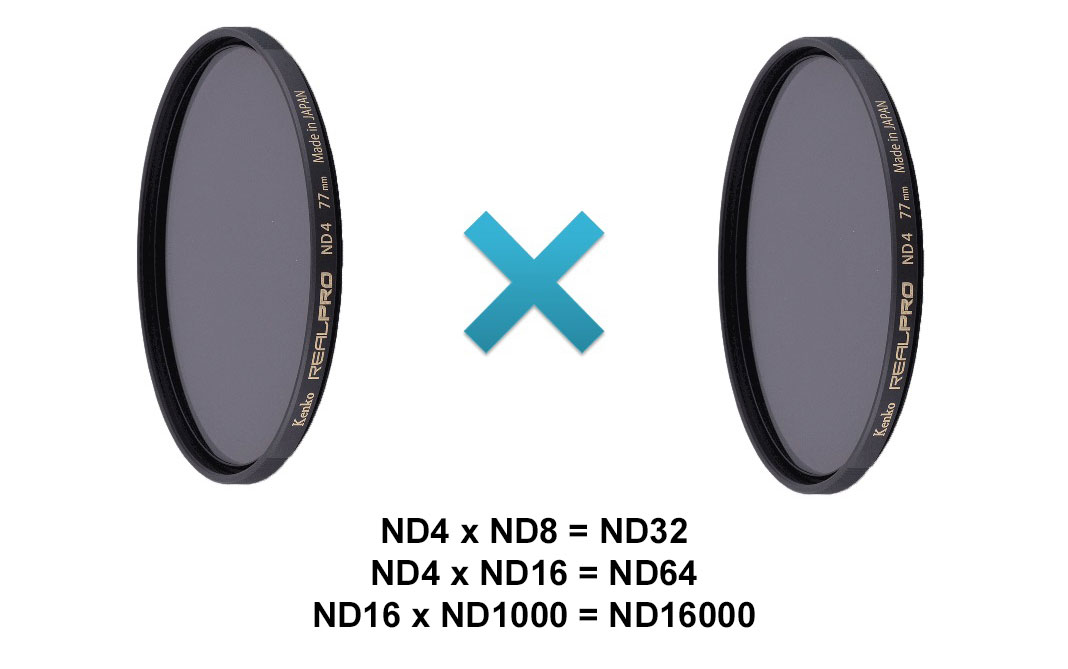
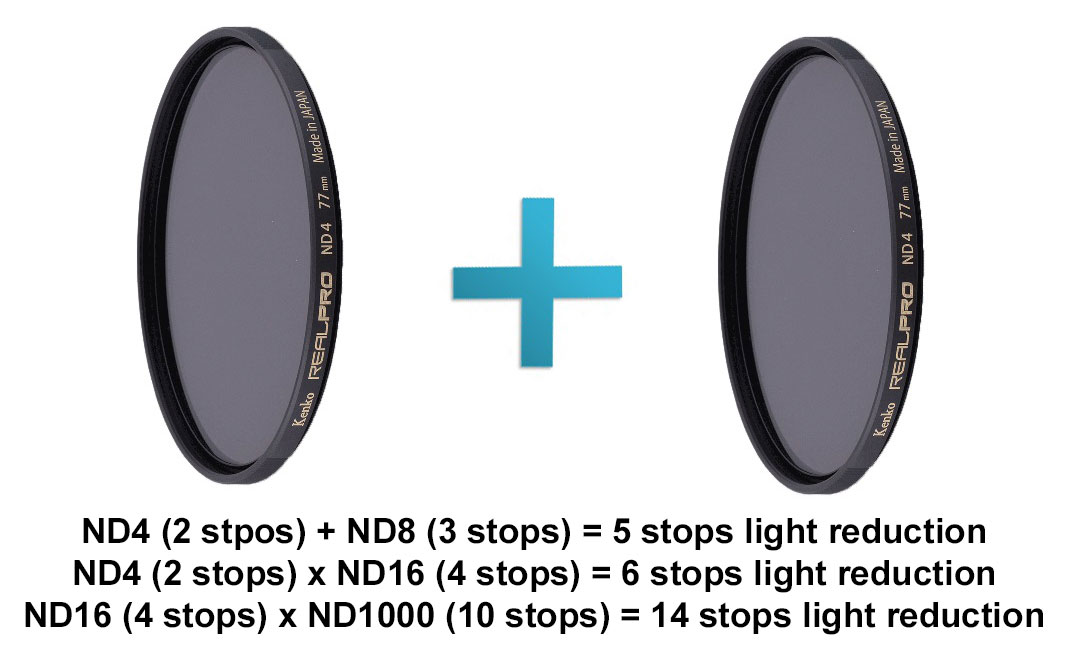
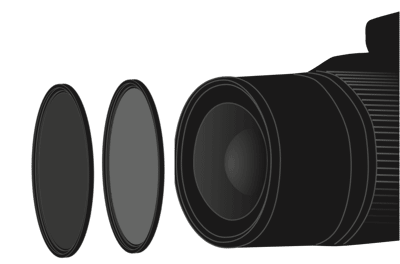
Combining two ND filters: What ND factor? How many stops in light reduction?
When using two ND filters combined together, you can calculate the total ND factor by simply multiplying their ND factors
Tip: Bring more than one ND filter always with you!
The best way to control shutter speed in every shooting situation and scenario is to always have more than one ND filters at hand! For example, ND8, N64 and ND1000 are a must-bring combination in many situations.
Doing so makes also possible to combine filters and get the desired ND value when one ND filter single factor won't be enough.
By adding the aperture value of both filters, you can calculate the total amount of light loss
Tip: Variable ND filter, a valid alternative.
With Variable ND filters, you can change and adjust the amount of light loss with just one filter. It makes these filters particularly suitable for shooting video with DSLR cameras.
Choosing the most suitable ND filter for your scenarios
Waterfalls, rivers: ND8/ND16/ND32/ND64
By shooting with a slow shutter speed, you can create those silky and smooth waves often seen in those dreamy-like shots of waterfalls and rivers. A 1/4 sec ~ 1 sec shutter speed usually works well in these scenarios. As for the right filter, if it's your first time using ND filters, an easy to use ND16 and a sufficiently effective slow shutter speed will do the trick.
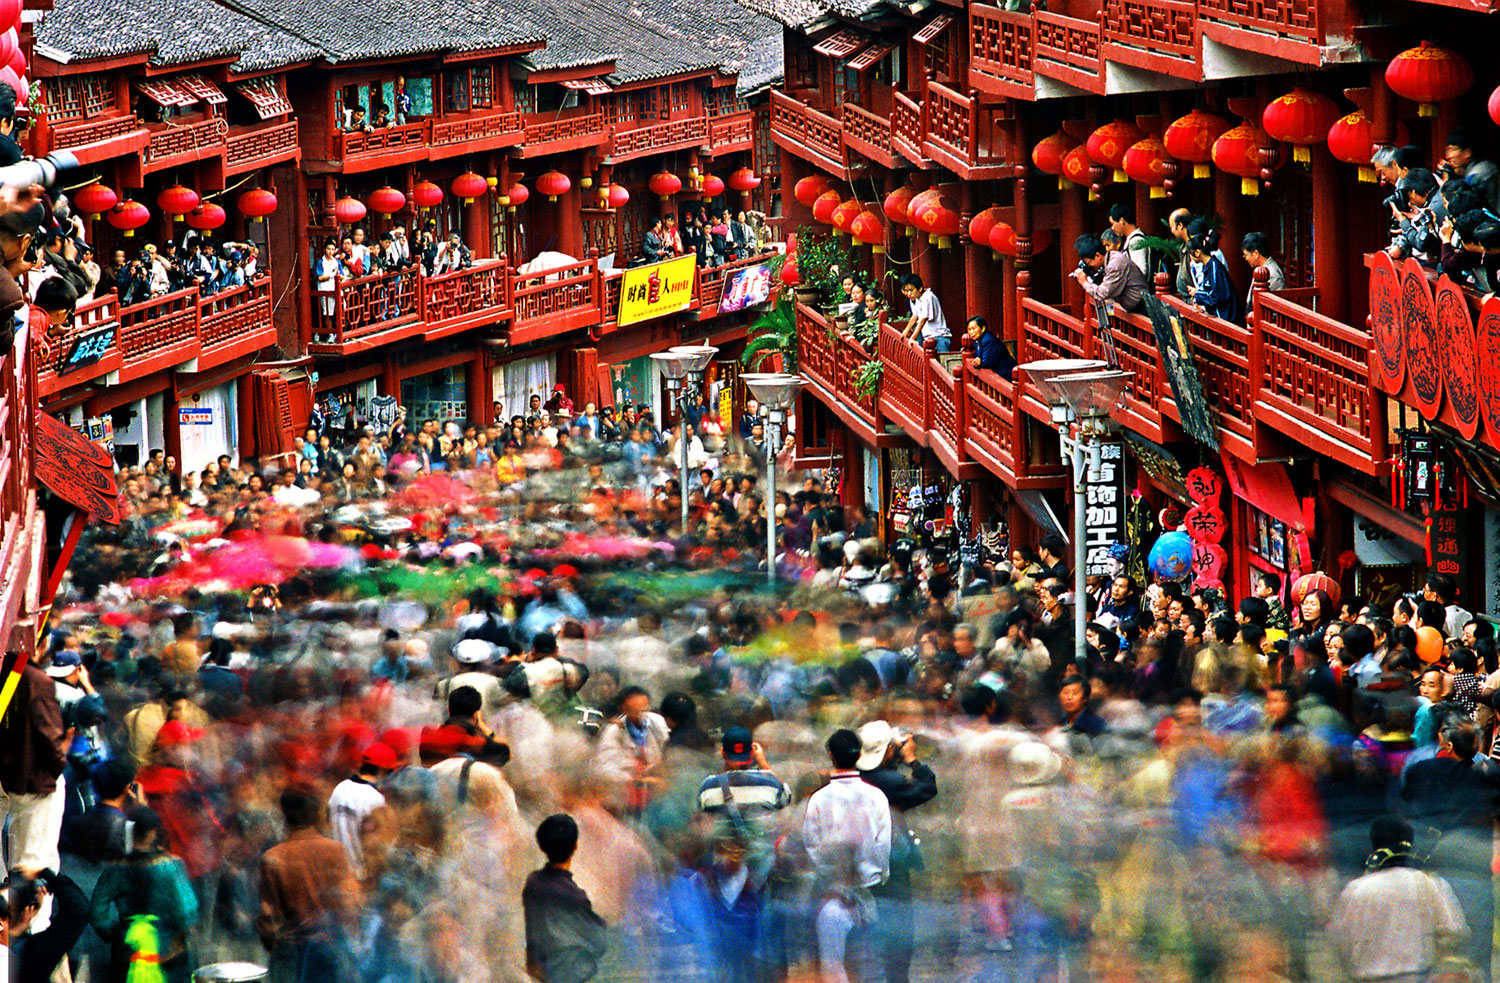
People bustling in the city: ND1000/ND500
By shooting city scenarios with a slow shutter speed, you can properly reproduce that blurred motion of people walking back and forth through the streets. The lively and chaotic atmosphere of the city is thus effectively impressed in your shot. With a 30 sec and above shutter speed, the silhouette of passers-by can be almost completely faded, while people standing will appear sharp and still, for an amusing contrast.
A ND8 or ND16 filter and a 1/30~1/10 sec shutter speed will do great here for snaps capturing people with a slightly blurring effect.
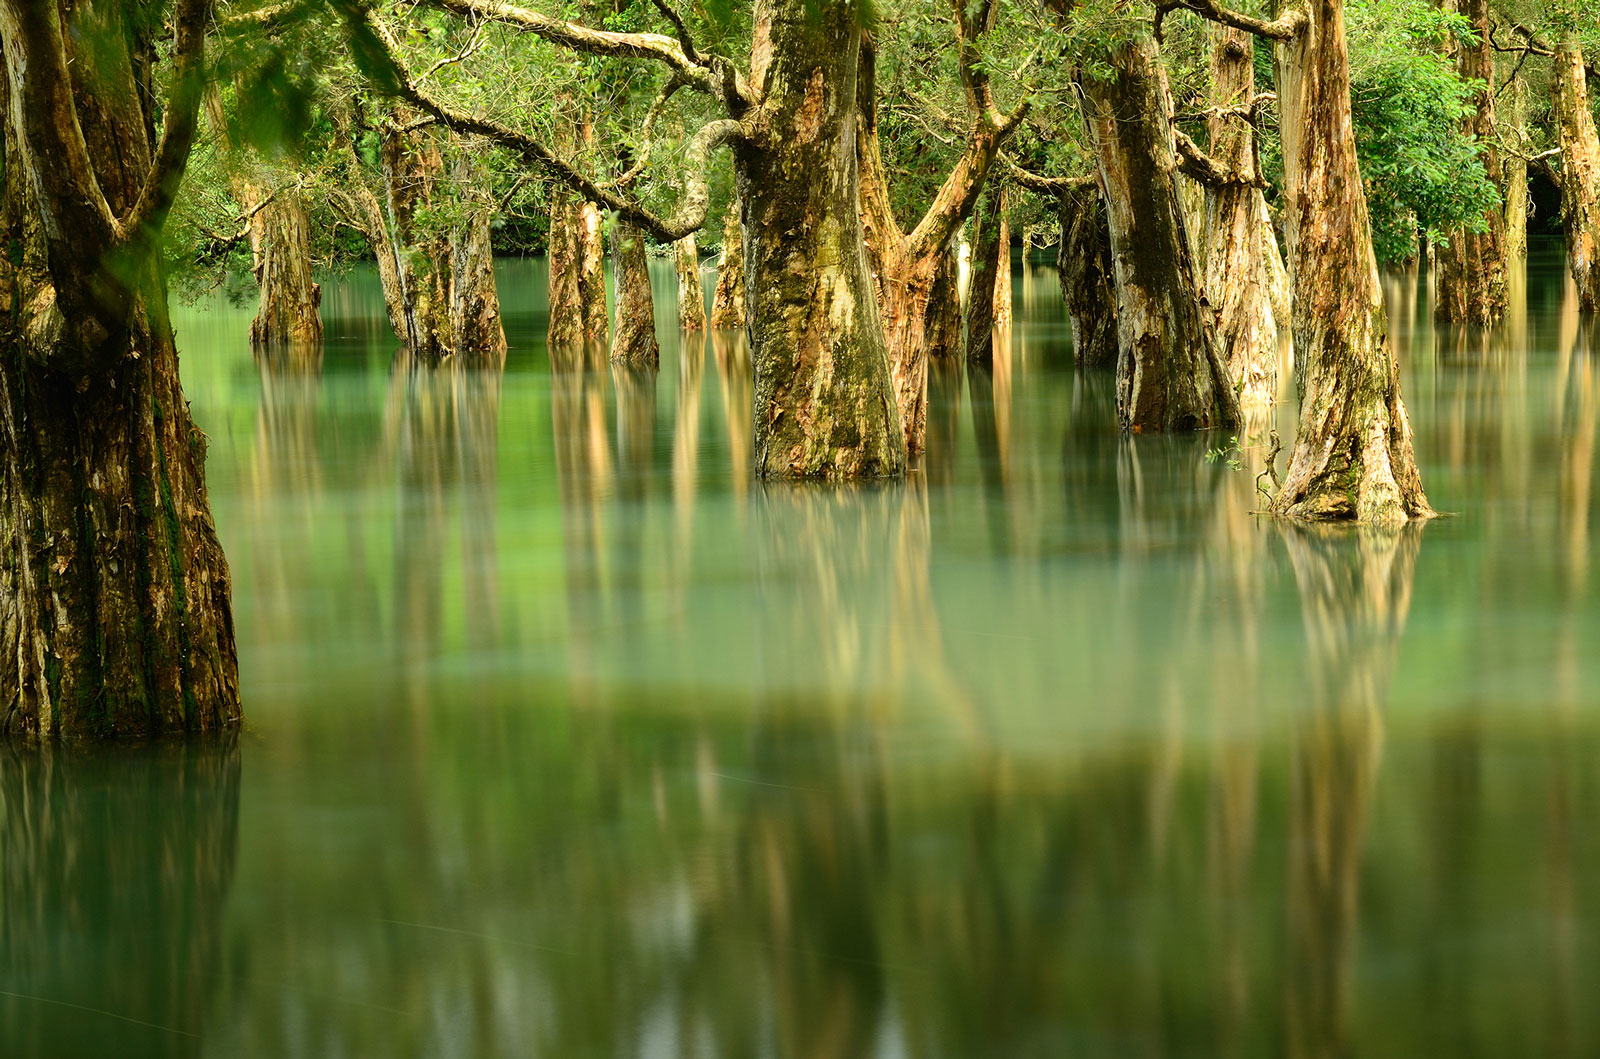
Sea and lakes: ND1000/ND500
By shooting seas or lakes with a slow shutter speed, you can effectively picture out a smooth image of water surfaces.
A water surface in a cloudless, sunny day can get excessively bright, though, so that even an ND1000 factor and a 1 sec shutter speed won't be enough. Here, let's set a 60 sec long exposure to minimize even the smallest wavelet, then let's try on a combination of ND1000+ND16 filters.
As the sun wanes and brightness changes, it may not be that easy to guess the right exposure.
Here, having more than one filter at hand, like a ND64, ND8 or a variable ND, can save the game.
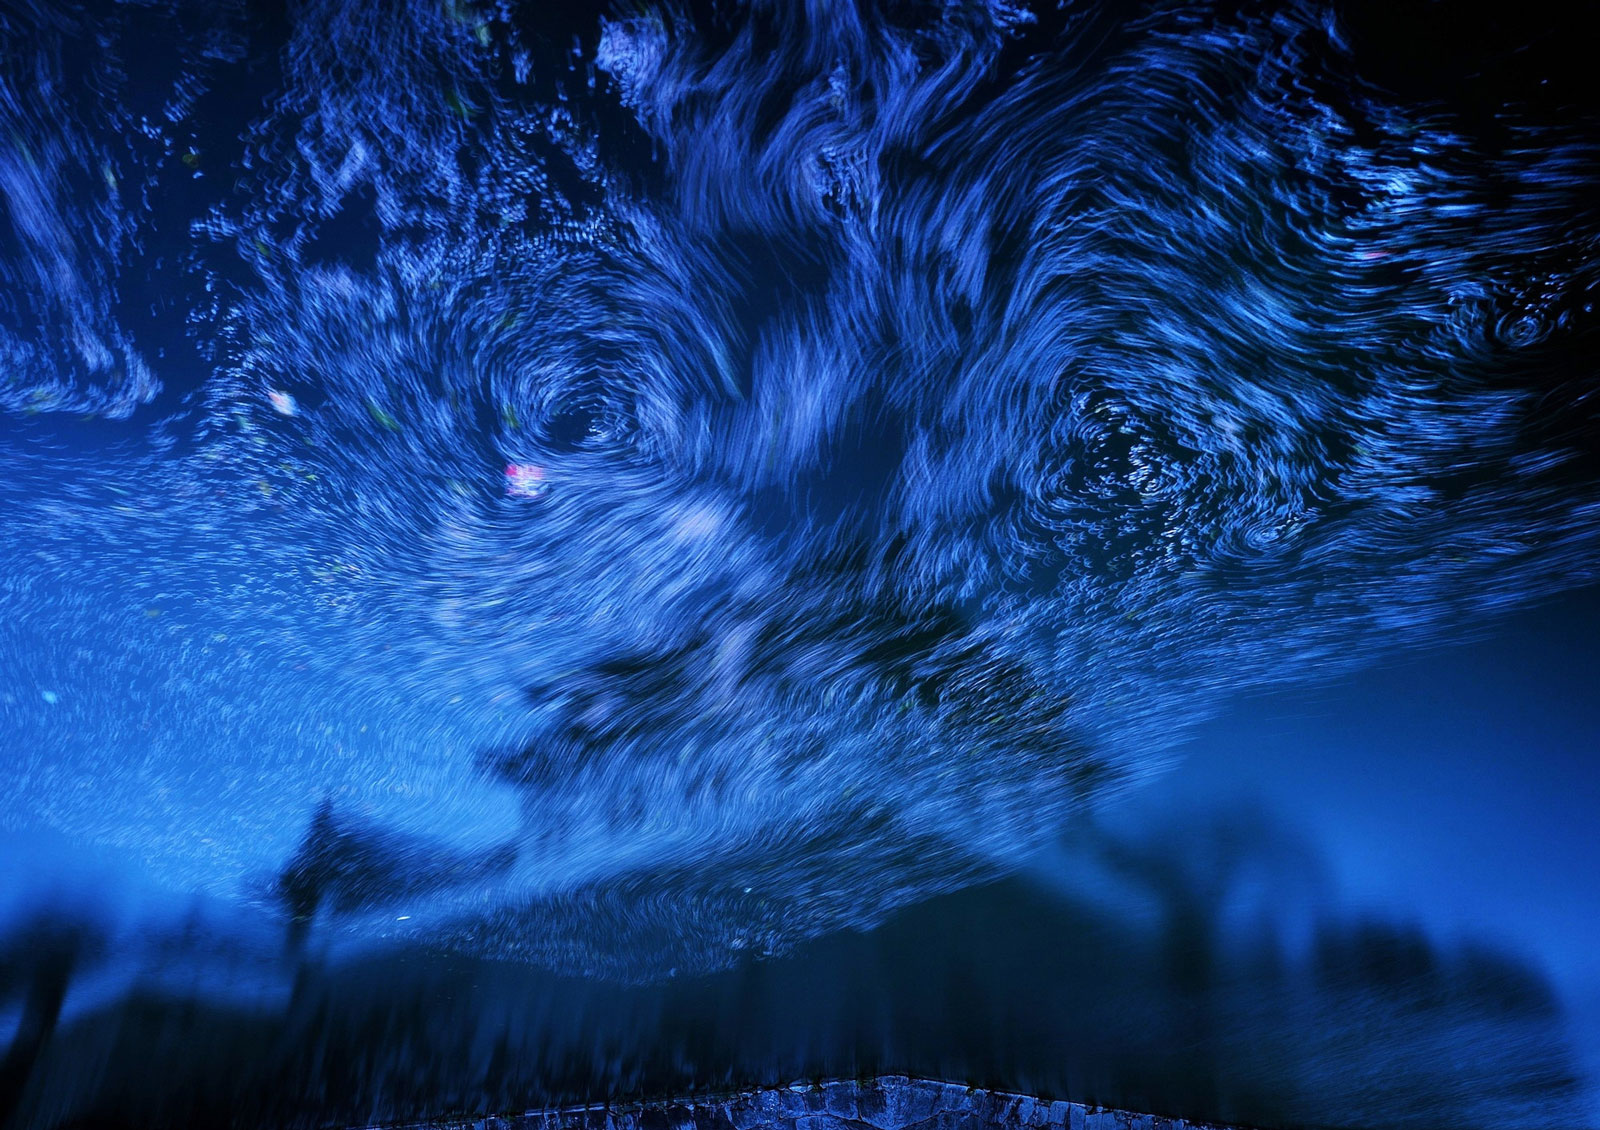
Clouds: ND1000/ND500
With a slow shutter speed, you can capture the dynamic movement of clouds drifting in the wind.
As both speed and direction of clouds will change quickly, by setting shutter speed at 60sec. you can capture an impressive image of a majestic flow of clouds.
Shouldn't a ND1000 be enough, try a combination of ND8+ND16 filters.
Cityscape light trails: ND4/ND8
The light cast at night by cars, boats, airplanes, a panoramic wheel, etc. can be captured in the form of light trails by slowing down the shutter speed.
Adding the proper ND filter will further slow the shutter speed down, making these light tails looking longer, without interruptions from corner to corner.
Here, thanks to an already slow shutter speed, the most suitable ND filter will be one with a low ND factor, like ND4 or ND8.

Fireworks: ND4/ND8
Fireworks are a very bright shooting subject, so that overexposure can occur even at low ISO sensitivity settings. Without using ND filters, the necessary f-number will be excessively high, resulting in poor image quality due to light diffraction. By using ND filters, on the other hand, you can capture those colorful and bright fireworks in correctly exposed images.
With cameras standard ISO100 or ISO200 sensitivity settings, we recommend ND4 and ND8 respectively.
Panning shots: ND4/ND8/ND16
Panning is a photographic method used to capture moving objects. By moving the camera at the same pace of the shooting object, the background appears blurred in the final image. It's a great technique visually to capture and express high speed. Using ND filters is fundamental here, as you will need to set your shutter speed at an extremely low value to make this shooting technique effective.
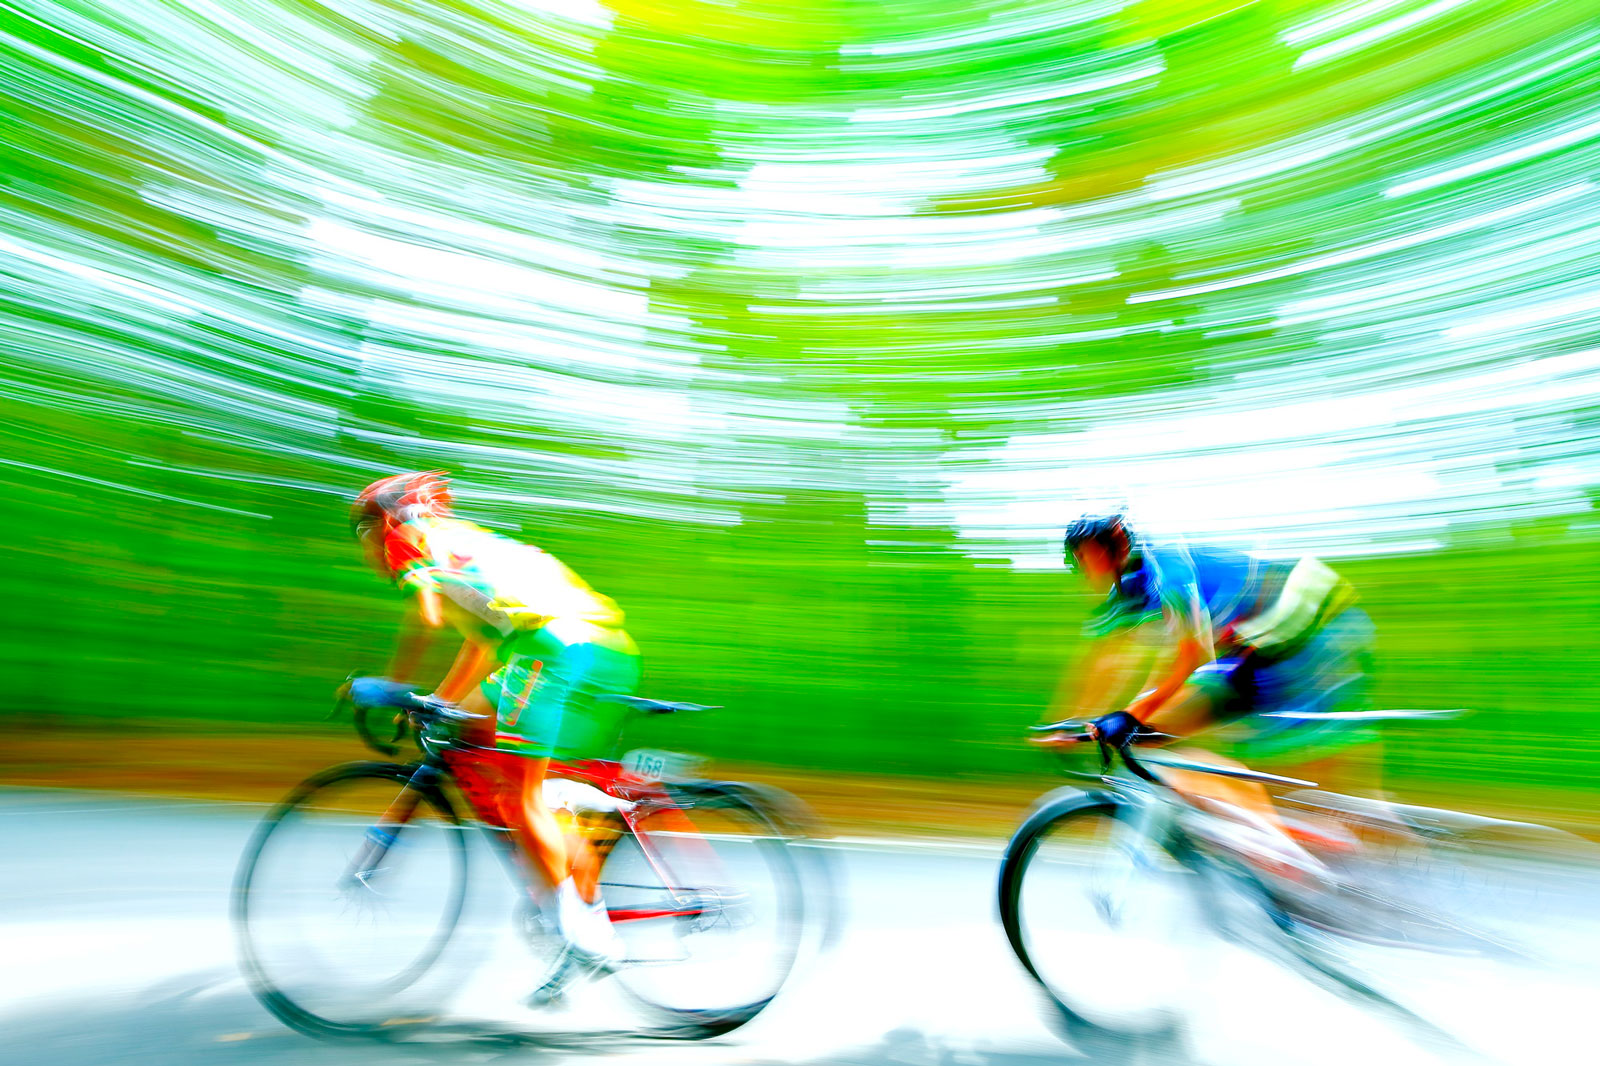
The proper shutter speed value also depends on the shooting object but, generally speaking, a shutter speed of 1/30 sec. is a good reference.
Floral rafts: ND1000/ND500
ND filters with a high density, like ND1000, are particularly suitable to capture the path of petals flowing slowly, or the lines and spirals traced by leaves on a water surface.
In shadowed scenarios, a ND64 it's a good one already. With a test shot, check how far it flows and in how many seconds, then set the proper shutter speed. Moreover, with the proper shutter speed and ND filter, you can also capture and express the movement of tree leaves and branches swinging in the wind.

ND filters: How to use with slow shutter speed
One example of shooting method
|
|
|
|
|
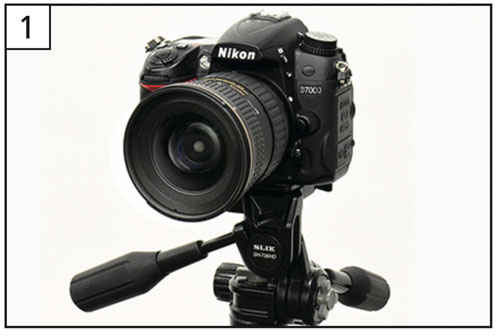 Secure your camera on a tripod
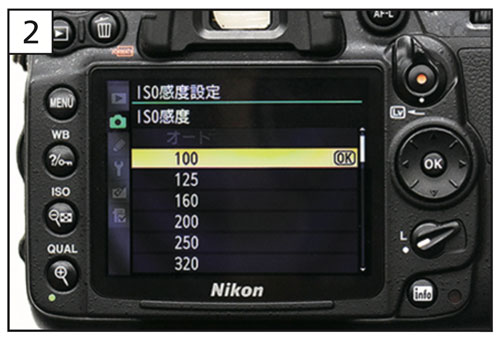 Camera setting
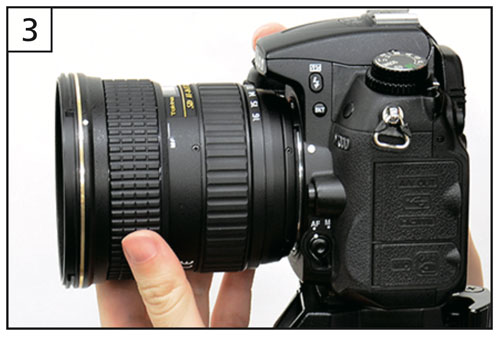 Composition and focusing
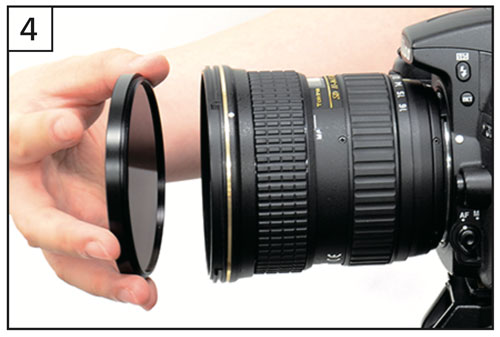 Attaching ND filter and shooting
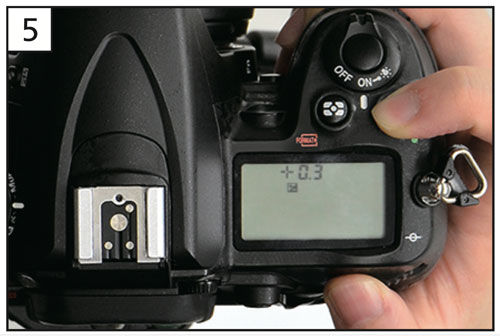 Adjusting exposure
Hot tip: If you want to slow down shutter speed even more, you just need to set for a higher F number. If you want to speed up shutter speed, try by increasing ISO setting.
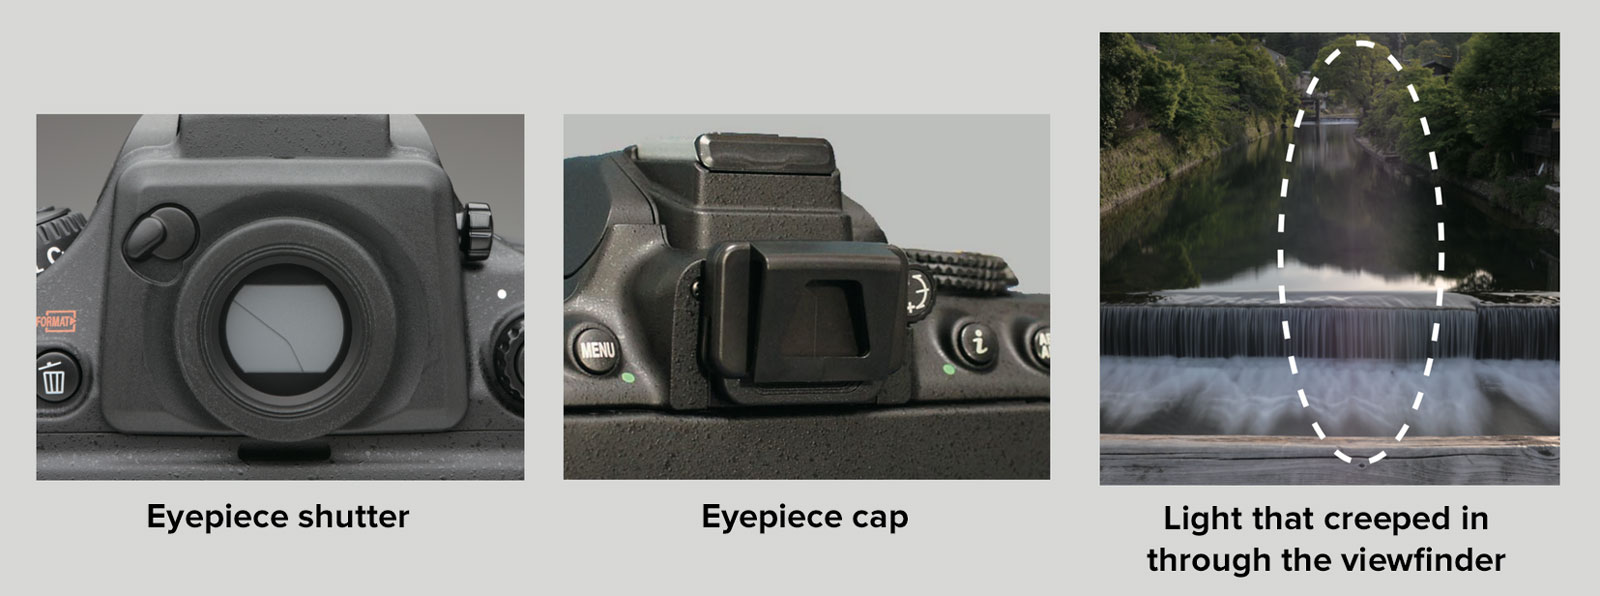
Pay attention to back light when shooting with DSLR cameras
When shooting with DSLR cameras, light rays filtering into the view finder may cause exposure errors, resulting in unwanted light captured on the final image. To avoid this, it is recommended to close the eyepiece shutter or attach eyepiece caps/covers. Alternatively, you can simply cover the eyepiece shutter with a handkerchief, etc. to prevent back light from filtering in.
ND FILTERS Q&A
What ND filter should I choose?
|
 If you want to try shooting with one ND filter and at slow shutter speed for the first time, the best choice for now would be a high versatility ND filter, like a ND8 or ND16. As their ND value is not high, these filters are easy to use and suitable for beginners.
Can I leave my protector filter on the lens when using ND filters?
|
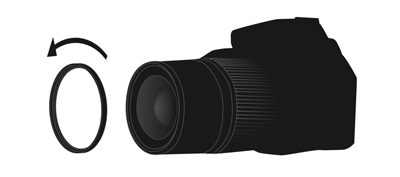 No. Before attaching a ND filter, make sure to remove any protector filter from your lens. Stacking up two filters may cause vignetting (black corners on the final image). Also, flare is more likely to occur with two filter glasses overlapped.
Exposure measurements are so hard! Is there any easy way to calculate it?
|
 Recently dedicated smart phone apps can calculate what will be the shutter speed when using ND filters. Dedicated apps are OK!
Is a tripod that necessary?
|
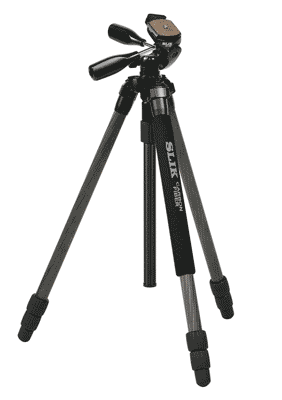 Except for panning and snaps, yes, a tripod is a necessary tool in slow shutter photography. Make sure to choose one you find stable and robust. A cable release will be also necessary to further prevent unwanted shaking and to control timing when releasing the shutter. Tripod is necessary!
What is the correct order when stacking up two ND filters?
|
 As a general rule, the ND filter with the higher density value goes on the outside, toward the shooting object. Before unwanted reflections occur in between the two filters, front ND filter will decrease the amount of light, that will cause that reflections. Higher ND outside!
How to set a shutter speed faster than 30 sec?
|
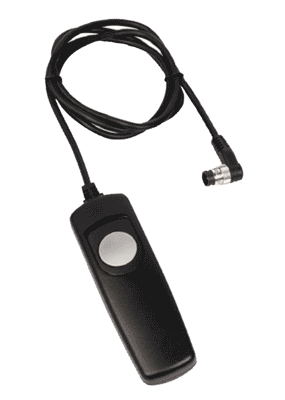 Camera settings allow setting shutter speed up to max. 30 sec. For faster shutter speed, select "bulb" (B) mode; then, with the help of a cable release, leave the shutter open for all the time you decided for your exposure time. For more accurate measurements, a cable release with timer incorporated is particularly helpful. Cable release is necessary!
Are ND filters necessary when taking videos with DSLR cameras?
|
 When shooting video, a proper shutter speed needs to be set according to the frame rate (fps) value. (It usually equals to double the frame rate). If the shutter speed is too fast, the video images will appear unnaturally disconnected. So, the answer to this question is: Yes, ND filters are necessary for smooth and natural video footages.
Any tips to deeply understand slow shutter photography?
|
 Whenever a photo from photography dedicated magazines, WEB sites, SNS etc. drags your attention for its beauty and awesomeness, remember to pay attention to those data (shutter speed, aperture, ISO settings) usually reported below the image. As you keep taking your own photos while checking data from other photos, you will eventually master slow shutter photography and find your own style.
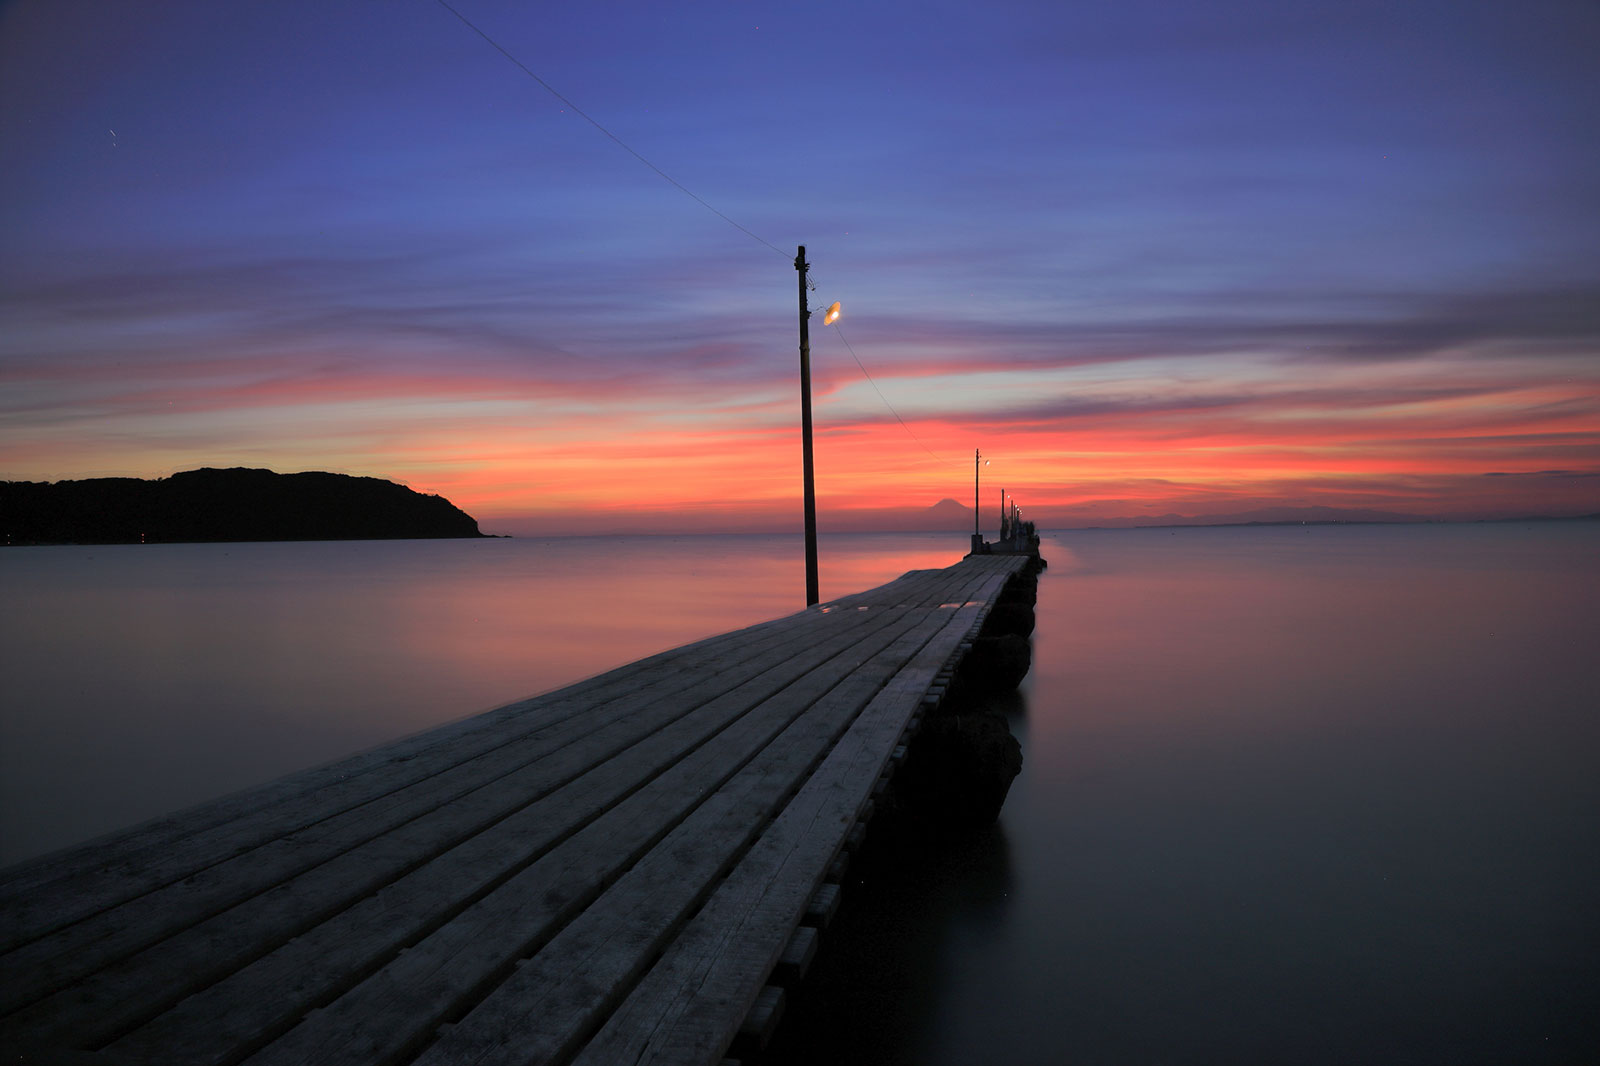
Slow shutter photography with ND filters: some unique shots full of creativity
Kenko features a full line-up of ND filters to choose from according to your desired ND factor. Find more by clicking on the banner below: